Koa
基本介绍
Koa是Node.js中非常出名的一款WEB框架,其特点是短小精悍性能强。
它由Express原版人马打造,同时也是Egg框架的设计蓝图,可以说Koa框架的学习性价比是非常高的。
官方文档

项目搭建
我们先初始化一个项目:
$ npm initTypeScript可以让项目更加容易维护,所以安装TypeScript是不可或缺的一部分:
$ npm install typescript ts-node @types/node peer dependencies yourself --save当安装完成后,需要在根目录中新建src目录以及server.ts文件:
$ mkdir ./src$ touch ./src/server.ts下一步是填入TypeScript的配置文件:
$ tsc --init配置文件内容如下:
{ "include": [ "./src/**/*", // 仅编译src目录下的所有ts文件 ], "exclude": [ "./src/test/**/*", // 不编译src目录中test目录下所有的ts文件 ], "compilerOptions": { "target": "ES6", // 编译后生成的js版本为es6 "module": "CommonJS", // 编译后的模块使用规范为CommonJs "lib": [ // node环境中测试ts代码所需要使用的库 "ES6" ], "outDir": "./dist", // 编译后生成的js文件存放路径 "allowJs": true, // 二次编译js文件 "checkJs": true, // 验证js文件语法 "removeComments": false, // 编译后的js文件删除注释信息 "noEmitOnError": true, // 如果编译时出现错误,编译将终止 "strict": true, // 启用TypeScript的严格模式 "alwaysStrict": true, // 启用JavaScript的严格模式 "noFallthroughCasesInSwitch": true, // 检测switch语句块是否正确的使用了break "noImplicitReturns": true, // 检测函数是否具有隐式的返回值 "noUnusedLocals": false, // 检测是否具有未使用的局部变量 "noUnusedParameters": false, // 检测是否具有未使用的函数参数 "allowUnreachableCode": true, // 检测是否具有永远不会运行的代码 }}由于Koa是第三方框架,所以你应该先安装它:
$ npm install koa --save$ npm install @types/koa --save快速上手
使用Koa框架搭建一个HTTP服务器非常的简单,你只需要以下几行代码即可搞定。
import * as Koa from "koa"const server: Koa = new Koa()server.use(async (ctx: Koa.Context) => { ctx.response.body = "HELLO KOA!";})server.listen(3000, "localhost", 128, (): void => { console.log("server started at http://localhost:3000");})级联操作
每一个视图函数中,都具有2个参数ctx和next,而通过next你可以实现级联操作。
如下所示,它将按顺序打印1、2、3、4、5:
import * as Koa from "koa"const server: Koa = new Koa()server.use(async (ctx: Koa.Context, next: Koa.Next) => { const start: number = Date.now() console.log("1"); await next() console.log("5"); ctx.response.body = "HELLO KOA!"})server.use(async (ctx: Koa.Context, next: Koa.Next) => { console.log("2"); await next(); console.log("4");})server.use(async (ctx: Koa.Context, next: Koa.Next) => { console.log("3"); console.log("hello middleware");})server.listen(3000, "localhost", 128, (): void => { console.log("server started at http://localhost:3000");})路由系统
koa-router
默认的Koa框架路由系统不是很完善,对此你可以使用koa-router插件,官方所提供的文档非常齐全,你可以自行前往查看,包括嵌套路由、动态路由等知识在官方文档里面都有详细的示例,这里不再阐述。
首先需要进行下载:
$ npm install koa-router --save$ npm install @types/koa-router --save然后就可以进行使用了,注意现在Middleware View Function的编写不再是通过server.use()进行注册了而是通过router.use()进行注册,代码如下:
import * as Koa from "koa"import * as Router from 'koa-router'const server: Koa = new Koa()const router: Router = new Router()// 1. 装载插件server.use(router.routes())// 2.书写视图,注意后面都是编程router.use()router.get("/api/get", async (ctx: Koa.Context, next: Koa.Next) => { // 3.等待之前的插件处理完成后再运行Middleware View Function await next() ctx.response.body = "HELLO KOA!"})server.listen(3000, "localhost", 128, (): void => { console.log("server started at http://localhost:3000");})请求方式
koa-router能够限制请求方式,如下所示,其中all()方法能支持所有的请求:
router .get('/', (ctx, next) => { ctx.body = 'Hello World!'; }) .post('/users', (ctx, next) => { // ... }) .put('/users/:id', (ctx, next) => { // ... }) .del('/users/:id', (ctx, next) => { // ... }) .all('/users/:id', (ctx, next) => { // ... });请求相关
ctx.request
ctx是一个上下文对象,你可以通过ctx.request获得本次HTTP服务的请求对象。
在请求对象中它提供了很多属性可供我们使用,以下只例举一些比较常见的:
属性 | 简写 | 描述 |
ctx.request.header | ctx.header | 可获取或者设置请求头对象 |
ctx.request.headers | ctx.headers | 同上 |
ctx.request.method | ctx.method | 可获取或者设置请求方式 |
ctx.request.href | ctx.href | 可获取完整的href |
ctx.request.origin | ctx.origin | 仅获取协议、主机、端口号 |
ctx.request.host | ctx.host | 仅获取主机、端口号 |
ctx.request.hostname | ctx.hostname | 仅获取主机 |
ctx.request.url | ctx.url | 仅获取url部分 |
ctx.request.path | ctx.path | 仅获取path部分 |
ctx.request.query | ctx.query | 仅获取query部分 |
ctx.request.ip | ctx.ip | 获取请求的ip |
结果如下:
ctx.request.href http://localhost:3000/api/get?name=Jackctx.request.origin http://localhost:3000ctx.request.host localhost:3000ctx.request.hostname localhostctx.request.url /api/get?name=Jackctx.request.path /api/getctx.request.query { name: 'Jack' }params
对于动态的URL params,可以使用ctx.params获取,注意!这是vue-router所提供的一个方法,它并不存在于ctx.request对象中:
import * as Koa from "koa"import * as Router from 'koa-router'const server: Koa = new Koa()const router: Router = new Router()server.use(router.routes())router.get("/api/get/:id?", async (ctx: Koa.Context, next: Koa.Next) => { await next() // http://localhost:3000/api/get/8?k1=v1 console.log(ctx.params.id); // 8 ctx.response.body = "HELLO KOA!"})server.listen(3000, "localhost", 128, (): void => { console.log("server started at http://localhost:3000");})get请求参数
对于URL中的query请求参数来说,你可以直接通过ctx.request.query进行获取:
import * as Koa from "koa"import * as Router from 'koa-router'const server: Koa = new Koa()const router: Router = new Router()server.use(router.routes())router.get("/api/get/:id?", async (ctx: Koa.Context, next: Koa.Next) => { await next() // http://localhost:3000/api/get/8?k1=v1 console.log(ctx.request.query); // { k1: 'v1' } ctx.response.body = "HELLO KOA!"})server.listen(3000, "localhost", 128, (): void => { console.log("server started at http://localhost:3000");})post请求参数
对于请求体中的data请求参数来说,我们可以通过第三方插件koa-body来让它的获取更加的方便。
因为默认的ctx.request对象中没有获取请求体的方法,但是使用koa-body插件后它会向ctx.request中封装一个body属性,调用它你将会获得data请求参数对象。
要想使用koa-body插件,需要对其进行安装:
$ npm install koa-body --save$ npm install @types/koa__cors --save示例如下:
import * as Koa from "koa"import * as Router from 'koa-router'import * as koaBody from "koa-body"const server: Koa = new Koa()const router: Router = new Router()server.use(router.routes())server.use(koaBody({ // 是否支持 multipart-formdata 的表单 multipart: true,}))router.post('/api/post', async (ctx, next) => { // 等待之前的插件处理完成后再运行Middleware View Function // 否则你必须将server.use()的插件应用语句放在 // Middleware View Function的下面 await next() console.log(ctx.request.body); ctx.response.body = "HELLO KOA!"});server.listen(3000, "localhost", 128, (): void => { console.log("server started at http://localhost:3000");})上传文件
koa-body插件同样支持对文件自动上传,如下所示,我们在使用之前需要对其进行一些小小的配置,在获取文件后它将自动进行上传。
我们可通过ctx.request.files参数获取文件对象,与ctx.request.body一样,它也是koa-body所封装的方法:
import * as fs from "fs"import * as path from "path"import * as Koa from "koa"import * as Router from 'koa-router'import * as koaBody from "koa-body"const server: Koa = new Koa()const router: Router = new Router()server.use(router.routes())server.use(koaBody({ // 是否支持 multipart-formdata 的表单 multipart: true, formidable: { // 上传的目录 uploadDir: path.join(__dirname, 'upload'), // 保持文件的后缀 keepExtensions: true, // 最大支持上传8M的文件 maxFieldsSize: 8 * 1024 * 1024, // 文件上传前的设置 onFileBegin: (name: string, file: any): void => { const filePath: string = path.join(__dirname, "upload"); // 检查是否有upload目录 if (!fs.existsSync(filePath)) { fs.mkdirSync(filePath); console.log("mkdir success!"); } } }}))router.post('/api/upload', async (ctx, next) => { // 等待之前的插件处理完成后再运行Middleware View Function // 否则你必须将server.use()的插件导入语句放在 // Middleware View Function的下面 await next() // 获取文件对象avatar const avatar: any | null = ctx.request.files["avatar"] // 自动写入... // 将上传后的信息自动返回 ctx.response.set("Content-Type", "application/json") ctx.response.body = JSON.stringify(avatar)});server.listen(3000, "localhost", 128, (): void => { console.log("server started at http://localhost:3000");})文件对象中包含的属性如下:
{ "size": 文件大小, "path": "上传路径", "name": "文件原本的名字", "type": "image/jpeg", "mtime": "文件最后修改时间"}koa-body配置
以下是koa-body在进行使用时的一级配置项:
参数名 | 描述 | 类型 | 默认值 |
patchNode | 将请求体打到原生 node.js 的ctx.req中 | Boolean | false |
patchKoa | 将请求体打到 koa 的 ctx.request 中 | Boolean | true |
jsonLimit | JSON 数据体的大小限制 | String / Integer | 1mb |
formLimit | 限制表单请求体的大小 | String / Integer | 56kb |
textLimit | 限制 text body 的大小 | String / Integer | 56kb |
encoding | 表单的默认编码 | String | utf-8 |
multipart | 是否支持 multipart-formdate 的表单 | Boolean | false |
urlencoded | 是否支持 urlencoded 的表单 | Boolean | true |
text | 是否解析 text/plain 的表单 | Boolean | true |
json | 是否解析 json 请求体 | Boolean | true |
jsonStrict | 是否使用 json 严格模式,true 会只处理数组和对象 | Boolean | true |
formidable | 配置更多的关于 multipart 的选项 | Object | {} |
onError | 错误处理 | Function | function(){} |
stict | 严格模式,启用后不会解析 GET, HEAD, DELETE 请求 | Boolean | true |
以下是koa-body在进行使用时的二级(formidable)配置项:
参数名 | 描述 | 类型 | 默认值 |
maxFields | 限制字段的数量 | Integer | 1000 |
maxFieldsSize | 限制字段的最大大小 | Integer | 2 * 1024 * 1024 |
uploadDir | 文件上传的文件夹 | String | os.tmpDir() |
keepExtensions | 保留原来的文件后缀 | Boolean | false |
hash | 如果要计算文件的 hash,则可以选择 md5/sha1 | String | false |
multipart | 是否支持多文件上传 | Boolean | true |
onFileBegin | 文件上传前的一些设置操作 | Function | function(name,file){} |
ctx.req
ctx.request是Koa框架所封装的请求对象,而ctx.req则是原生的http库的请求对象。
我们不建议对其进行使用,具体所包含的属性可以参照http库中的req对象。
响应相关
ctx.response
ctx是一个上下文对象,你可以通过ctx.response获得本次HTTP服务的响应对象。
在响应对象中它也提供了很多属性或者方法可供我们使用,以下只例举一些比较常见的:
属性/方法 | 简写 | 描述 |
ctx.response.header | 无 | 可获取或者设置响应头对象 |
ctx.response.headers | 无 | 同上 |
response.get() | ctx.get() | 可获取某个响应头字段 |
response.has() | ctx.has() | 可检测某个响应头字段是否存在 |
response.set() | ctx.set() | 用来设置单个响应头字段与值,也可用一个对象来设置多个响应头字段与值 |
response.remove() | ctx.remove() | 可删除某个响应头字段 |
ctx.response.body | ctx.body | 可获取或者设置响应体,可设置string、Buffer、Stream、Object或者Array的JSON字符串以及null |
ctx.response.status | ctx.status | 可获取或者设置响应码 |
ctx.response.message | ctx.message | 可获取或者设置响应信息,它与响应码相关联 |
ctx.response.redirect | ctx.redirect | 可进行重定向跳转 |
ctx.response.type | ctx.type | 获取或者设置响应的mime-type类型 |
设置响应码
响应码一般来说不需要我们手动设置,它的默认值大多数情况下总是200或者204.
如果你想手动进行设置,可参照下面这个示例:
router.get("/api/get", async (ctx: Koa.Context, next: Koa.Next) => { ctx.response.status = 403; ctx.response.message = "Reject service";})设置响应头
如果你没有使用TypeScript来规范你的项目代码,则可以直接对响应头做出结构改变的操作:
router.get("/api/get", async (ctx: Koa.Context, next: Koa.Next) => { ctx.response.headers = { "Content-Type": "text/plain; charset=utf-8" }; ctx.response.body = "HELLO KOA!";})如果你使用了TypeScript来规范你的项目代码,则必须通过ctx.response.set()方法来设置响应头:
// 设置一个 ctx.response.set(k, v)ctx.response.set("Content-Type", "text/plain; charset=utf-8");// 设置多个 ctx.response.set({k1 : v1, k2 : v2, ...})ctx.response.set({ "Content-Type": "text/plain; charset=utf-8", "Token" : "=fdss9d9k!-=f23"});重定向
对于需要跳转的路由,可以使用ctx.response.redirect()方法来进行跳转:
import * as Koa from "koa"import * as Router from 'koa-router'const server: Koa = new Koa()const router: Router = new Router()server.use(router.routes())router.get("/", async (ctx: Koa.Context, next: Koa.Next) => { ctx.redirect("/index"); ctx.response.status = 302;})router.get("/index", async (ctx: Koa.Context, next: Koa.Next) => { ctx.response.body = "HELLO KOA!";})server.listen(3000, "localhost", 128, (): void => { console.log("server started at http://localhost:3000");})CORS跨域
利用第三方插件@koa/cors解决跨域问题:
$ npm install @koa/cors它的使用非常简单,直接server.use()即可,当然你也可以对其进行详细配置,这里不再进行配置举例:
import * as Koa from "koa"import * as cors from "@koa/cors"const server: Koa = new Koa()server.use(cors())ctx.res
ctx.response是Koa框架所封装的响应对象,而ctx.res则是原生的http库的响应对象。
我们不建议对其进行使用,具体所包含的属性可以参照http库中的res对象。
jsonwebtoken
基本介绍
Koa框架中提供了Cookie相关的操作,但是Cookie在目前的项目开发中使用的比较少,故这里不再进行例举,而是推荐使用第三方插件jsonwebtoken来生成JWT进行验证。
如果你不了解JWT,我之前也有写过相关的技术文章,你可以搜索并进行参考。
现在我假设你已经了解过了JWT相关的知识,让我开始第一步,安装jsonwebtoken这个插件吧。
$ npm install jsonwebtoken --save安装后之后我们需要在src目录中新建一个JWT目录以及一个index.js文件,用来JWT存放相关的代码:
$ mkdir ./src/jwt$ touch ./src/jwt/index.ts封装使用
一般的手动签发token我们需要用到下面3种类型的数据:
- header:头部信息,可定义加密类型、加密方式
- playload:荷载信息,可定义token过期时间、签发者、接受者以及私有声明信息,但不建议存放敏感信息
- secret:密钥,该密钥只能由服务端所知晓
但是jsonwebtoken对其进行封装,直接使用config来配置即可,以下是签发和验证token的案例,默认它将采用HASH256算法进行JWT格式封装:
import * as JWT from "jsonwebtoken"// 服务端的字符串,绝对保密const secret = "=937dce32&?f99"function issueToken(userID: number, userName: string, expiration: number = 86400 * 14) { // 定义荷载信息,不要存放敏感的诸如用户密码之类的数据 const playLoad = { id: String(userID), name: userName, } // 定义配置文件,下面有一些选项也是属于荷载信息的一部分,如过期时间、签发时间、面向谁签发的 const config = { // 定义头部信息 header: {}, // 过期时间、按秒计算,也可以是字符串,如1day、1min等 expiresIn: expiration, // 在签发后多久之前这个token是无用的,如果是数字则是按秒计算 notBefore: `120ms`, // 面向谁签发的 audience: userName, // 发行者是谁 issuer: "Node.js KOA", // 该token的发布主题 subject: "demo", // 不使用时间戳 noTimestamp: true, } // 第一个对象中也可以添加额外的属性,它将作为荷载信息被格式化 return JWT.sign(playLoad, secret, config)}function verifyToken(token: string | string[]): { verify: boolean, playLoad: { id: string, name: string, nbf: number, exp: number, aud: string, iss: string, sub: string } | null } { // 如果没有抛出异常,则验证成功 try { return { playLoad: JWT.verify(token, secret), verify: true } } // 如果抛出了异常,则验证失败 catch { return { playLoad: null, verify: false } }}export { issueToken, verifyToken }使用案例:
// 手动传入用户ID以及用户姓名还有token过期时间const token = issueToken(19, "Jack", 7);// 传入token验证是否成功console.log(verifyToken(token));验证成功返回的结果:
{ playLoad: { id: '19', name: 'Jack', nbf: 1633537512, exp: 1633537519, aud: 'Jack', iss: 'Node.js KOA', sub: 'demo' }, verify: true}实战演示
我们以一个简单的案例来进行说明,后端有2个api接口,分别是index和login。
若用户第一次访问主页,则必须先进行登录后才能访问主页,此后的20s内用户不用再重新登录:
import * as Koa from "koa"import * as Router from 'koa-router'import * as koaBody from 'koa-body'import * as cors from "@koa/cors"import * as JWT from "./jwt/index"// 模拟数据库const userDataBase: { id: number, username: string, password: string, age: number }[] = [ { id: 1, username: "Jack", password: "123456", age: 18 }]const server: Koa = new Koa()const router: Router = new Router()server.use(cors())server.use(koaBody({ // 是否支持 multipart-formdata 的表单 multipart: true,}))server.use(router.routes())server.use(async (ctx: any, next: any) => { await next() // 由于所有返回的数据格式都是JSON,故这里直接进行生命 ctx.response.set("Content-Type", "application/json");})router.get("/api/index", async (ctx: Koa.Context, next: Koa.Next) => { await next() const token: string | string[] = ctx.request.get("JWT"); // 如果能获取token就进行验证,判断是否是伪造请求 if (token) { const { verify, playLoad } = JWT.verifyToken(token) if (verify) { // 验证通过,直接返回playLoad给前端 ctx.response.body = JSON.stringify({ code: 200, message: playLoad }) } else { // 验证未通过,token无效或者已过期 ctx.response.body = JSON.stringify({ code: 403, message: "Please do not forgery information" }) } } // 获取不到token,你应该先进行登录 else { ctx.response.body = JSON.stringify({ code: 401, message: "please log in first" }) }})router.post("/api/login", async (ctx: Koa.Context, next: Koa.Next) => { await next() const name: string = ctx.request.body.name; const pwd: string = ctx.request.body.pwd; // 如果用户存在于数据库中,就签发token,并且设置在响应头中返回 for (const row of userDataBase) { if (row.username === name && row.password === pwd) { const token = JWT.issueToken(row.id, row.username, 20); // 设置响应头JWT ctx.response.set("JWT", token); ctx.response.body = JSON.stringify({ code: 200, message: "login successful" }); return } } // 用户不存在 ctx.response.body = JSON.stringify({ code: 406, message: "Login error, username or password is incorrect" })})server.listen(3000, "localhost", 128, (): void => { console.log("server started at http://localhost:3000");})代码测试
下面我们使用postMan来测试一下这个功能过程。
首先是用户第一次到我们的网站尝试访问主页,此时会提示它应该先进行登录:
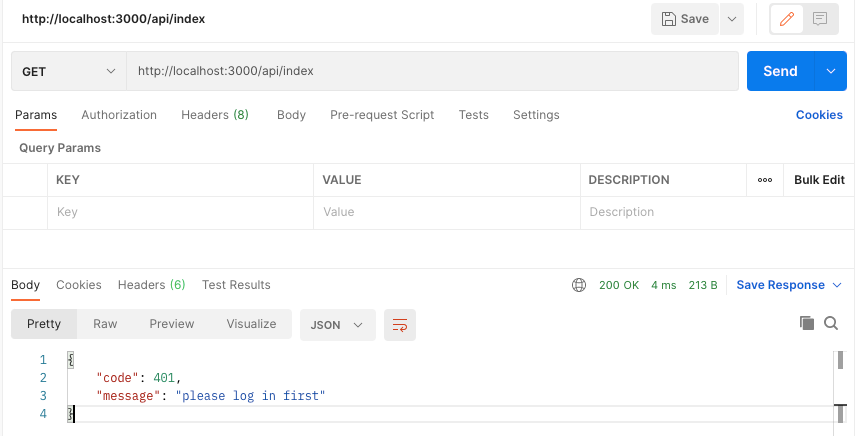
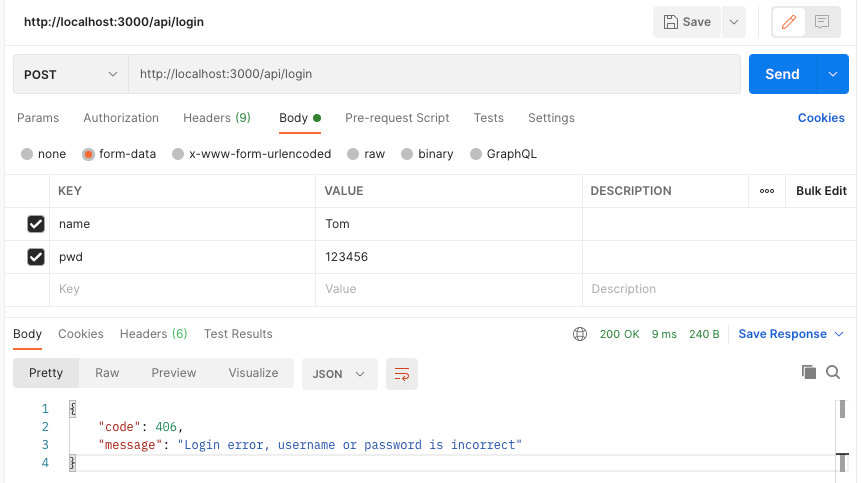
然后我们进行登录,下面是登录错误的情况,数据库没有这个用户:
下面是登录成功后的情况,它会返回给你一个JWT的响应字段:
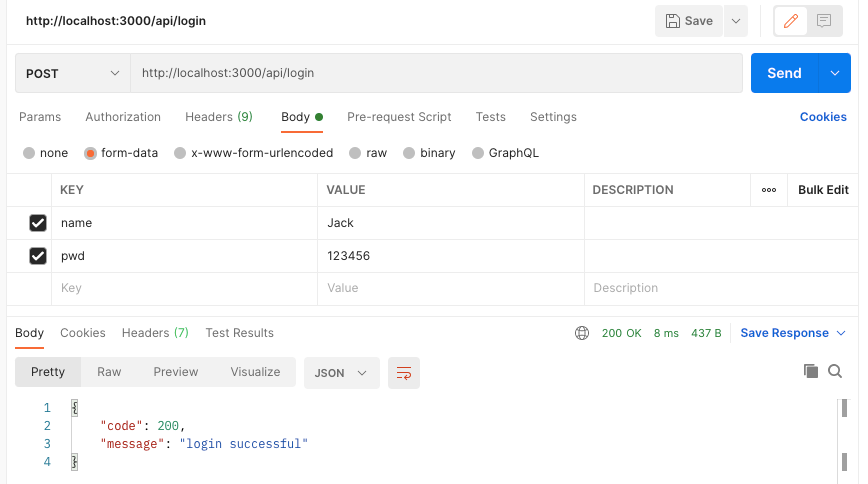
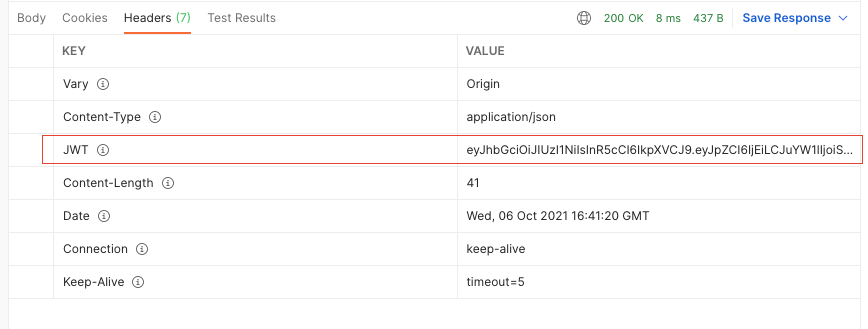
我们需要复制这个JWT响应字段的value值,并且将它添加到访问index时的请求头里,注意请求头的字段也必须是JWT,因为我们的后端做了限制,那么接下来的20s内你对index的访问都将是正常的:
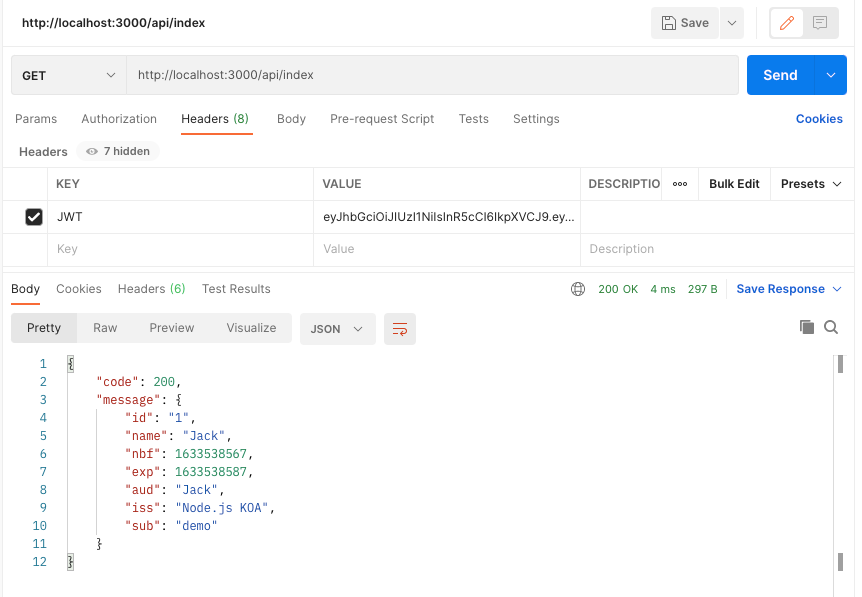
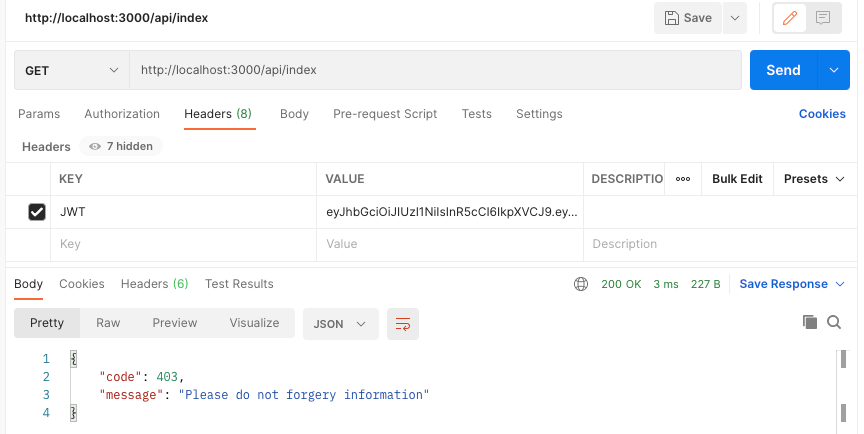
如果token过期或者被伪造,它将提示你不要伪造token,其实这里有心的朋友可以处理的更细节一点:
其他插件推荐
好了,关于Koa框架的基本使用目前就到此结束了。
下面推荐一些Koa框架中可能会被使用到的插件:
- koa-compress:用于压缩内容,以便更快的完成HTTP响应
- koa-logger:提供日志输出
- koa-static:提供静态文件服务
- koa-view:提供视图模板渲染,适用于前后端混合开发
- koa-jwt:也是一款提供JWT认证的插件,不同于jsonwebtoken,它的局限性比较清
作者:云崖先生
 鲁公网安备37020202000738号