网上已搜索golang pprof,资料不少,简明高效的一个没看到,这篇文章5步教你用会pprof获取cpu和内存prof。
第1步:安装易用的pprof
golang自带的prof包是runtime/pprof,这个是低级别的,需要你手动做一些设置等等周边工作,不利于我们快速上手,利用pprof帮助我们解决实际的问题。这里推荐davecheney封装的pprof,它可以1行代码,让你用上pprof,专心解决自己的代码问题,下载:
go get github.com/pkg/profile
第2步:安装graphviz
pprof生成的prof文件时二进制的,需要把这个二进制的文件转换为我们人类可读的,graphviz可以帮助我们把二进制的prof文件转换为图像。Mac安装:
brew install graphviz
其他系统安装参考这里Graphviz Download。
第3步:修改你的main函数
只需要为hi.go增加这一行,defer profile.Start().Stop(),程序运行时,默认就会记录cpu数据:
package mainimport ( "fmt" "github.com/pkg/profile")func main() { defer profile.Start().Stop() sl := makeSlice() fmt.Printf("sum = %d\n", sumSlice(sl))}func makeSlice() []int { sl := make([]int, 10000000) for idx := range sl { sl[idx] = idx } return sl}func sumSlice(sl []int) int { sum := 0 for _, x := range sl { sum += x } return sum}第4步:编译运行你的函数
编译和执行hi.go。
go build hi.go./hi
应当看到类似的结果,它输出了生成的cpu.pprof的路径:
2018/11/07 19:47:21 profile: cpu profiling enabled, /var/folders/5g/rz16gqtx3nsdfs7k8sb80jth0000gn/T/profile046201825/cpu.pprofsum = 499999950000002018/11/07 19:47:21 profile: cpu profiling disabled, /var/folders/5g/rz16gqtx3nsdfs7k8sb80jth0000gn/T/profile046201825/cpu.pprof
第5步:可视化prof
可视化有多种方式,可以转换为text、pdf、svg等等。text命令是
go tool pprof --text /path/to/yourbinary /var/path/to/cpu.pprof
结果是:
go tool pprof -text ./hi /var/folders/5g/rz16gqtx3nsdfs7k8sb80jth0000gn/T/profile046201825/cpu.pprofFile: hiType: cpuTime: Nov 7, 2018 at 7:47pm (CST)Duration: 202.18ms, Total samples = 50ms (24.73%)Showing nodes accounting for 50ms, 100% of 50ms total flat flat% sum% cum cum% 40ms 80.00% 80.00% 40ms 80.00% main.makeSlice /Users/shitaibin/go/src/github.com/shitaibin/awesome/hi.go 10ms 20.00% 100% 10ms 20.00% main.sumSlice /Users/shitaibin/go/src/github.com/shitaibin/awesome/hi.go 0 0% 100% 50ms 100% main.main /Users/shitaibin/go/src/github.com/shitaibin/awesome/hi.go 0 0% 100% 50ms 100% runtime.main /usr/local/go/src/runtime/proc.go
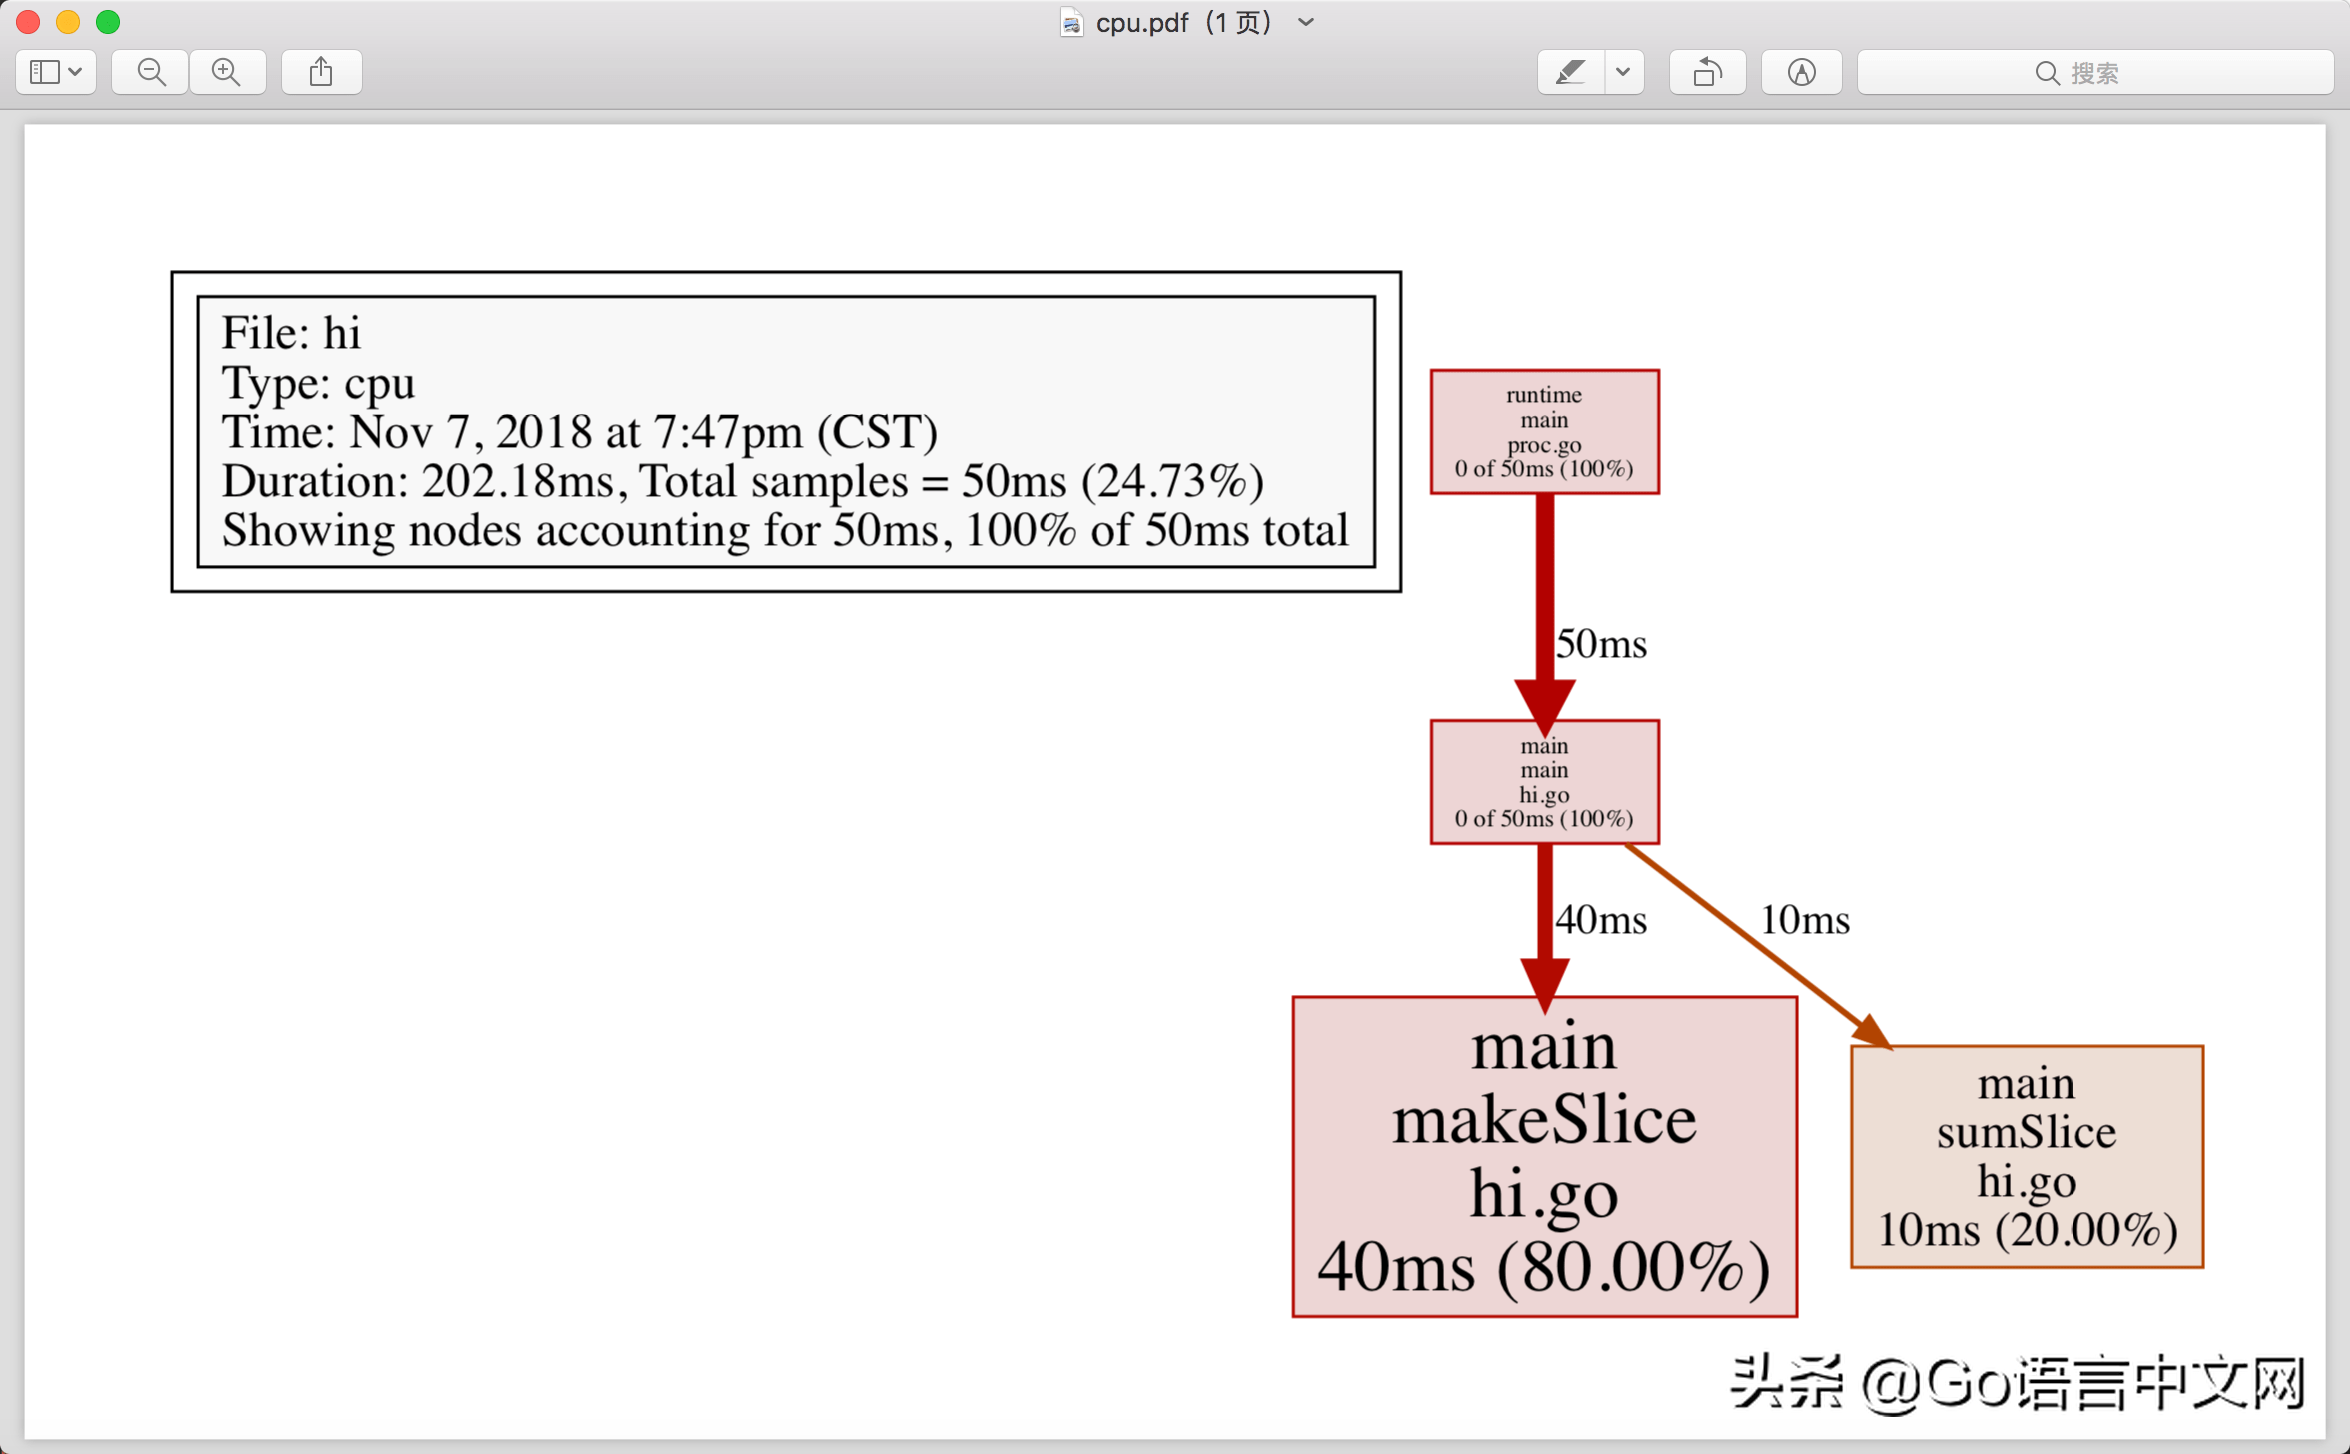
还有pdf这种效果更好:
go tool pprof --pdf /path/to/yourbinary /var/path/to/cpu.pprof > cpu.pdf
例子:
go tool pprof -pdf ./hi /var/folders/5g/rz16gqtx3nsdfs7k8sb80jth0000gn/T/profile046201825/cpu.pprof > cpu.pdf
效果:

5步已经结束,你已经学会使用cpu pprof了吗?
轻松获取内存pprof
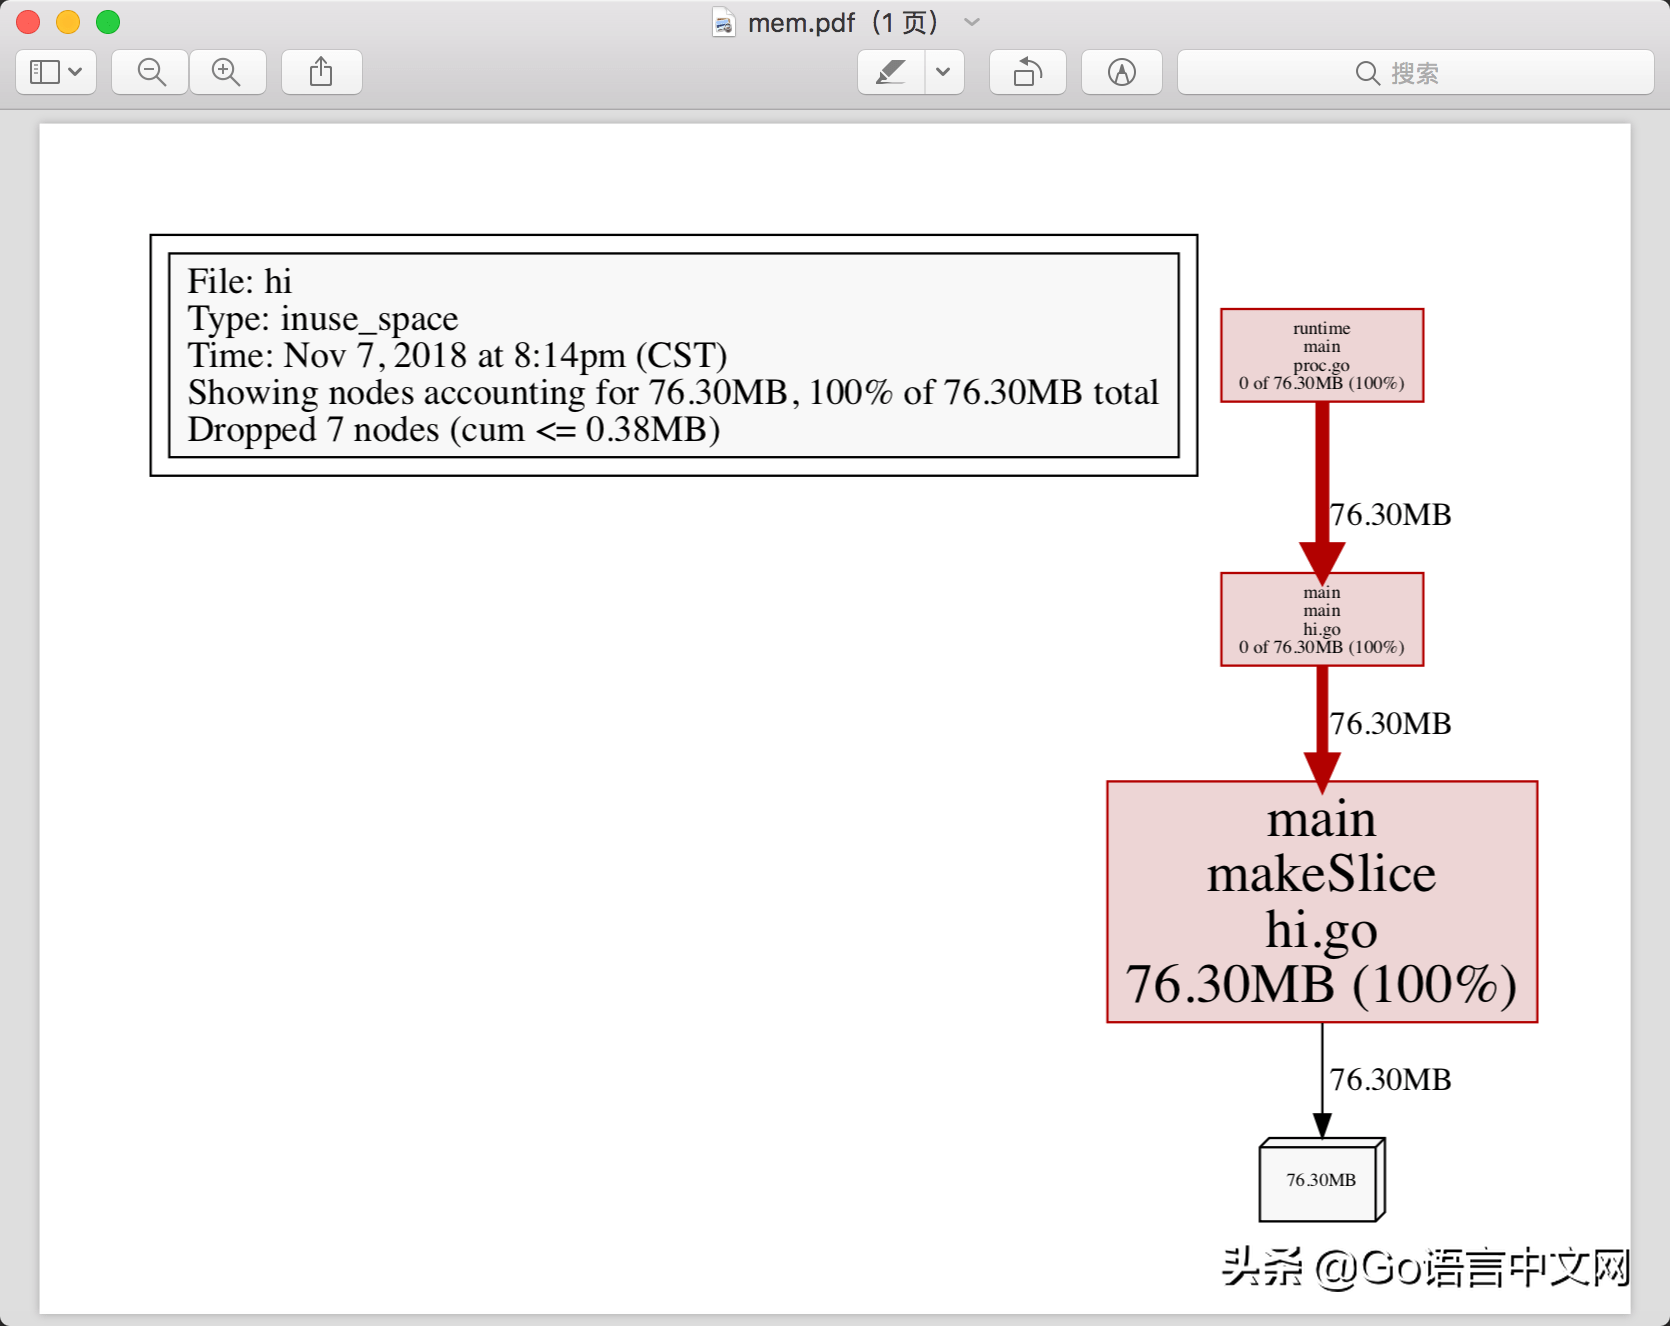
如果你掌握了cpu pprof,mem pprof轻而易举就能拿下,只需要改1行代码:
defer profile.Start(profile.MemProfile).Stop()
效果:
go tool pprof -pdf ./hi /var/folders/5g/rz16gqtx3nsdfs7k8sb80jth0000gn/T/profile986580758/mem.pprof > mem.pdf

如果这篇文章对你有帮助,不妨关注下我的Github,有文章会收到通知。本文作者:大彬,原创授权发布如果喜欢本文,随意转载,但请保留此原文链接:http://lessisbetter.site/2018/11/07/Golang-pprof-step-by-step/
Go语言中文网,致力于每日分享编码、开源等知识,欢迎关注我,会有意想不到的收获!

 鲁公网安备37020202000738号