零基础学习:如何利用OpenAI API打造自己的ChatGPT
发表时间: 2023-05-28 02:18

欢迎阅读本教程,接下来将带大家了解如何使用 OpenAI API构建个人的 ChatGPT 应用程序。本指南将引导您完成使用 OpenAI API 创建您自己的个性化/定制 ChatGPT 应用程序的过程。您将学习如何利用预训练模型并将它们集成到功能正常的应用程序中。
无论您是希望为项目添加 AI 功能的开发人员,还是只是对探索 AI 的可能性感兴趣的人,本教程都将指导您如何开始使用 OpenAI API 和 Next.js 构建 ChatGPT 应用程序!
本教程假定您具备 JavaScript 和 Next.js/React.js 的基本知识。如果您从未编写过 Next.js 代码,则应先阅读官方 Next.js 教程或者直接略过代码过程,可以自己尝试本地部署体验。
OpenAI API是一个基于云的平台,允许开发人员构建人工智能模型和应用程序。它提供对 OpenAI 最先进语言处理功能的访问,可用于开发聊天机器人、语言翻译模型等。
借助 OpenAI API,开发人员可以快速轻松地构建 AI 模型,而无需具备该领域的广泛知识或专业知识。该平台用户友好且易于访问,是经验丰富的 AI 开发人员和刚刚起步的开发人员的绝佳选择。
这只是一个超级简单的 Web 应用程序项目,我们可以使用 Next.js 和 OpenAI API 构建,您可以在其中与 OpenAI 预训练模型进行交互和对话。对于本教程,我们将创建 3 个提示模板,每个模板都有我们希望 AI 执行的行为方式(AI 助手、英语到其他语言和图像生成器)。由于这些是预先训练好的模型,我们必须就我们期望他们做什么给他们适当的指导。

它们旨在帮助您在使用 React.js 和 OpenAI 构建 ChatGPT 应用程序时节省时间和精力。
完全可定制和可配置,因此您可以根据自己的特定需求对其进行定制。无论您是想更改设计、添加新功能还是调整功能,此模板都可以让您完成所有工作。
您将可以访问预构建的 UI、示例代码库和指导您完成整个过程的说明。它还包括所有必要的功能,这些功能将节省您的时间并使您的应用程序更加健壮。
非常适合开发人员、研究人员或任何希望构建 ChatGPT 应用程序而无需从头开始的人。这是一个很好的工具,可以快速为您的想法制作原型并在您进行时对其进行改进。使用此模板,您将能够专注于有趣的部分 -试验 OpenAI API 并构建独特而强大的 AI 助手。
让我们开始吧,首先,让我们确保您的开发环境已准备就绪。
要创建 Next.js 应用程序,请打开您的终端,cd进入您要在其中创建应用程序的目录,然后运行以下命令:
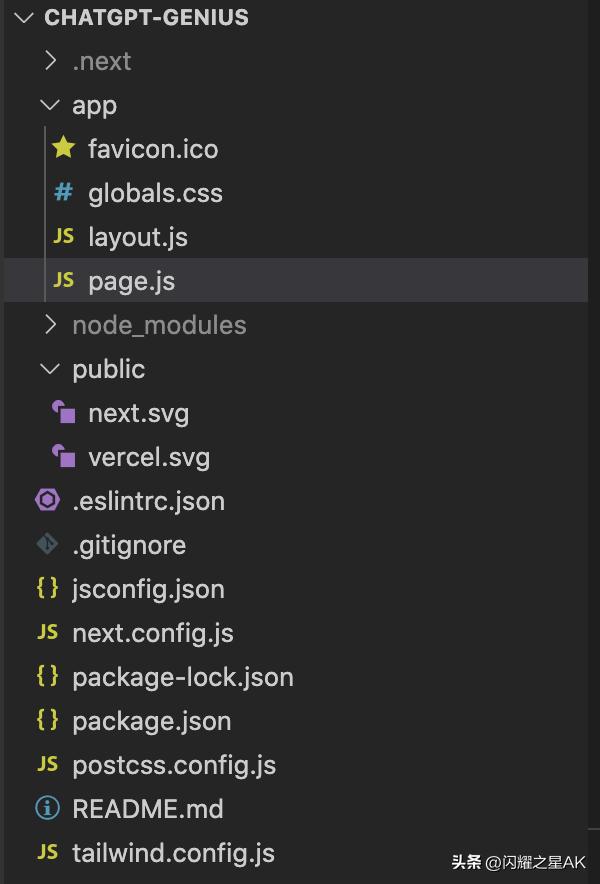
npx create-next-app@latest chatgpt-genius这是我为这个项目设置的 next.js:
创建完成后的Next.js项目脚手架目录如下,页面主入口为app/page.js
cd chatgpt-genius然后,运行以下命令:
npm run dev这将在端口3000上启动 Next.js 应用程序的“开发服务器”(稍后会详细介绍)。
让我们检查一下它是否正常工作。从浏览器打开http://localhost:3000 。

为了快速设计我们的应用程序,我们将使用 Tailwindcss,这是一个 CSS 框架。Tailwindcss是一个强调灵活性和实用性的 CSS 框架。它为您提供模块化、可自定义的类,可用于快速构建响应式 Web 布局。
让我们通过 npm 安装 Tailwindcss 及其对等依赖项,然后运行 init 命令生成tailwind.config.js和postcss.config.js.
打开一个新的终端选项卡并在终端中键入以下命令:
npm install -D tailwindcss postcss autoprefixernpx tailwindcss init -p将路径添加到文件中的所有模板文件tailwind.config.js。
/** @type {import('tailwindcss').Config} */module.exports = { content: [ "./pages/**/*.{js,ts,jsx,tsx}", "./components/**/*.{js,ts,jsx,tsx}", ], theme: { extend: { }, }, plugins: [],}@tailwind将每个 Tailwind 层的指令添加到您的app/globals.css文件中。用这段代码替换所有内容:
@tailwind base;@tailwind components;@tailwind utilities;然后去app/page.js。用这段代码替换所有内容:
export default function Home() { return ( <h1 className="text-3xl font-bold underline"> Hello world! </h1> )}一旦一切都完成了。通过在终端中键入 cmd/ctrl + C 来重新启动服务器以停止它,然后npm run dev再次运行服务器,您应该会在http://localhost:3000。

接下来让我们构建这个页面吧!
让我们编辑app/page.js。
打开文件并在文件开头添加 for from 的app/page.js导入:Headnext/head
import Head from 'next/head';然后,更新导出的Home组件以包含该Head组件:
export default function Home() { return ( <> {/* Head */} <Head> <title>ChatGPT</title> </Head> </> )}您可以将此图像用作标题图标。放在app文件夹里,重命名为favicon.ico,默认会加载此ico
浏览器选项卡现在应该显示“ChatGPT”。
现在,更新app/page.js以将侧边栏和页面的主要部分分开。
import Head from "next/head";export default function Home() { return ( <> {/* Head */} <Head> <title>ChatGPT</title> </Head> {/* Main */} <div className={"w-full min-h-full"}> <div className="flex"> {/* Sidebar */} <div className="bg-gray-800 h-screen w-1/5 p-2"> </div> {/* Main area */} <div className="w-4/5 relative"> </div> </div> </div> </> )}你现在应该看到侧边栏和有侧主页面已经分开了

创建一个新文件style/bg.module.css并放置此自定义背景 CSS 代码。
.customBg{ background-color: #1f2937; background-image: url("data:image/svg+xml,%3Csvg width='20' height='20' viewBox='0 0 20 20' xmlns='http://www.w3.org/2000/svg'%3E%3Cg fill='%239C92AC' fill-opacity='0.52' fill-rule='evenodd'%3E%3Ccircle cx='3' cy='3' r='3'/%3E%3Ccircle cx='13' cy='13' r='3'/%3E%3C/g%3E%3C/svg%3E");}您可以在Hero Patterns中制作背景并将代码粘贴到bg.module.css.
div从此更新主要内容:
<div className={"w-full min-h-full"}>对此:
<div className={`w-full min-h-full ${custombg.customBg}`}>不要忘记将其导入app/page.jsas custombg。最后,你page.js应该看起来像这样:
import Head from "next/head";import custombg from "/styles/bg.module.css";export default function Home() { return ( <> {/* Head */} <Head> <title>ChatGPT</title> </Head> {/* Main */} <div className={`w-full min-h-full ${custombg.customBg}`}> <div className="flex"> {/* Sidebar */} <div className="bg-gray-800 h-screen w-1/5 p-2"> </div> {/* Main area */} <div className="w-4/5 relative"> </div> </div> </div> </> )}这是自定义背景效果:

首先,让我们构建新的聊天按钮和提示选项选择按钮。这是侧边栏中我们唯一需要的两个按钮。
现在,复制以下代码并替换page.js文件中的所有内容:
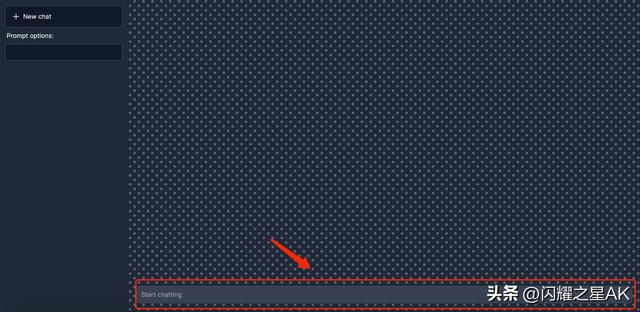
import Head from "next/head";import custombg from "/styles/bg.module.css";export default function Home() { return ( <> {/* Head */} <Head> <title>ChatGPT</title> </Head> {/* Main */} <div className={`w-full min-h-full ${custombg.customBg}`}> <div className="flex"> {/* Sidebar */} <div className="bg-gray-800 h-screen w-1/5 p-2"> <div> {/* New chat */} <div> <div className="text-gray-100 flex items-center text-xl p-3 bg-gray-900 rounded-md border border-slate-600 shadow-md m-1 hover:bg-gray-700" onClick=""> <svg xmlns="http://www.w3.org/2000/svg" fill="none" viewBox="0 0 24 24" strokeWidth={1.5} stroke="currentColor" className="w-6 h-6"> <path strokeLinecap="round" strokeLinejoin="round" d="M12 6v12m6-6H6" /> </svg> <h2 className="text-sm px-1"> New chat </h2> </div> </div> {/* Prompts */} <div> <h2 className="text-sm px-2 py-1 text-gray-100"> Prompt options: </h2> <div className="p-1 flex justify-center"> <select onChange="" className="form-select appearance-none block w-full px-3 py-1.5 text-gray-100 bg-gray-900 bg-clip-padding bg-no-repeat border border-slate-600 rounded transition ease-in-out m-0 focus:text-gray-100 focus:bg-gray-900 focus:border-slate-600 focus:outline-none"> {/* Prompts select button */} </select> </div> </div> </div> </div> {/* Main area */} <div className="w-4/5 relative"> </div> </div> </div> </> )}如果您访问http://localhost:3000 ,您现在应该看到已添加新按钮。

添加了一个新的聊天和选择按钮。
目前,提示选项按钮不起作用,我们将在本教程的后面进行处理。
在主要区域,我们希望有两个方面,聊天区域和文本输入区域。让我们先添加输入区域。在上面添加以下代码Main area div:
{/* Text input area */}<div> <div className="p-5 absolute bottom-0 right-0 left-0"> <div className="flex justify-center mb-2"> {/* ClocLoader */} </div> <form className="relative" onSubmit=""> <input type="text" placeholder= "Start chatting" value="" required onChange="" rows="1" className="block p-2.5 w-full text-sm text-gray-50 bg-gray-700 rounded-lg focus:outline-none ring-gray-500 focus:border-gray-500 shadow-md" /> <button type="submit" className="right-2 bottom-3 absolute pr-2" > <svg xmlns="http://www.w3.org/2000/svg" viewBox="0 0 20 20" fill="gray" className="w-5 h-5"> <path d="M3.105 2.289a.75.75 0 00-.826.95l1.414 4.925A1.5 1.5 0 005.135 9.25h6.115a.75.75 0 010 1.5H5.135a1.5 1.5 0 00-1.442 1.086l-1.414 4.926a.75.75 0 00.826.95 28.896 28.896 0 0015.293-7.154.75.75 0 000-1.115A28.897 28.897 0 003.105 2.289z" /> </svg> </button> </form> </div></div>app/page.js或用以下代码替换所有内容:
import Head from "next/head";import custombg from "/styles/bg.module.css";export default function Home() { return ( <> {/* Head */} <Head> <title>ChatGPT</title> </Head> {/* Main */} <div className={`w-full min-h-full ${custombg.customBg}`}> <div className="flex"> {/* Sidebar */} <div className="bg-gray-800 h-screen w-1/5 p-2"> <div> {/* New chat */} <div> <div className="text-gray-100 flex items-center text-xl p-3 bg-gray-900 rounded-md border border-slate-600 shadow-md m-1 hover:bg-gray-700" onClick=""> <svg xmlns="http://www.w3.org/2000/svg" fill="none" viewBox="0 0 24 24" strokeWidth={1.5} stroke="currentColor" className="w-6 h-6"> <path strokeLinecap="round" strokeLinejoin="round" d="M12 6v12m6-6H6" /> </svg> <h2 className="text-sm px-1"> New chat </h2> </div> </div> {/* Prompts */} <div> <h2 className="text-sm px-2 py-1 text-gray-100"> Prompt options: </h2> <div className="p-1 flex justify-center"> <select onChange="" className="form-select appearance-none block w-full px-3 py-1.5 text-gray-100 bg-gray-900 bg-clip-padding bg-no-repeat border border-slate-600 rounded transition ease-in-out m-0 focus:text-gray-100 focus:bg-gray-900 focus:border-slate-600 focus:outline-none"> {/* Prompts select button */} </select> </div> </div> </div> </div> {/* Main area */} <div className="w-4/5 relative"> {/* Text input area */} <div> <div className="p-5 absolute bottom-0 right-0 left-0"> <div className="flex justify-center mb-2"> {/* ClocLoader */} </div> <form className="relative" onSubmit=""> <input type="text" placeholder= "Start chatting" value="" required onChange="" rows="1" className="block p-2.5 w-full text-sm text-gray-50 bg-gray-700 rounded-lg focus:outline-none ring-gray-500 focus:border-gray-500 shadow-md" /> <button type="submit" className="right-2 bottom-3 absolute pr-2" > <svg xmlns="http://www.w3.org/2000/svg" viewBox="0 0 20 20" fill="gray" className="w-5 h-5"> <path d="M3.105 2.289a.75.75 0 00-.826.95l1.414 4.925A1.5 1.5 0 005.135 9.25h6.115a.75.75 0 010 1.5H5.135a1.5 1.5 0 00-1.442 1.086l-1.414 4.926a.75.75 0 00.826.95 28.896 28.896 0 0015.293-7.154.75.75 0 000-1.115A28.897 28.897 0 003.105 2.289z" /> </svg> </button> </form> </div> </div> </div> </div> </div> </> )}你现在应该看到你的页面是这样的:
对于聊天区域,我们将制作一个新组件来显示您与 OpenAI 之间的聊天。让我们创建一个components新文件夹,并在该文件夹中创建一个名为的新文件chat.js 。应该是components/chat.js。
粘贴以下代码:
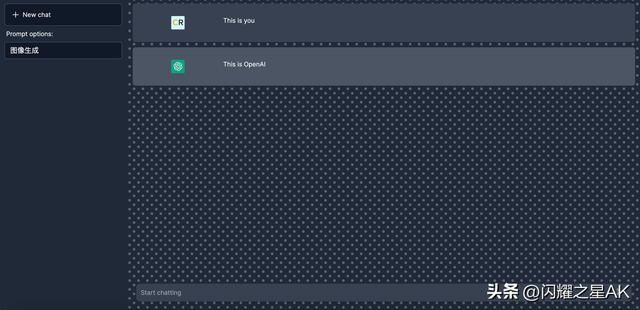
import Image from "next/image"import profilePic from "/public/user.png";import openAIPic from "/public/openai.png";export default function Chat({user}) { return ( <> <div id="chat" className="flex justify-center m-3 pr-28 py-7 rounded-md bg-gray-700 "> <div className="w-1/5"> <Image src= {profilePic} className="ml-auto mr-auto rounded-sm" alt="picture of you" width={30} height={30} /> </div> <div className="w-4/5 text-gray-100 text-sm" style={{whiteSpace: 'pre-wrap'}}> This is you </div> </div> <div id="chat" className="flex justify-center m-3 pr-28 py-7 rounded-md bg-gray-600 "> <div className="w-1/5"> <Image src= {openAIPic} className="ml-auto mr-auto rounded-sm" alt="picture of you" width={30} height={30} /> </div> <div className="w-4/5 text-gray-100 text-sm" style={{whiteSpace: 'pre-wrap'}}> This is OpenAI </div> </div> </> )}您可以将此图像用于profilePic. 放在public文件夹里。
现在我们已经完成了应用程序的 UI。目前,这只是真实对话发生时我们希望的样子的模型。

我们需要 API 密钥来连接到OpenAI API。我们去 OpenAI 网站,你需要一个帐户来获取 API 密钥。如果您没有帐户,请创建一个。单击您的个人资料图片和“查看 API 密钥”。创建一个新的密钥。

完成后,在根文件夹中创建一个名为.env的新文件并粘贴此代码:
OPENAI_API_KEY=在这里输入您的OpenAI API密钥。
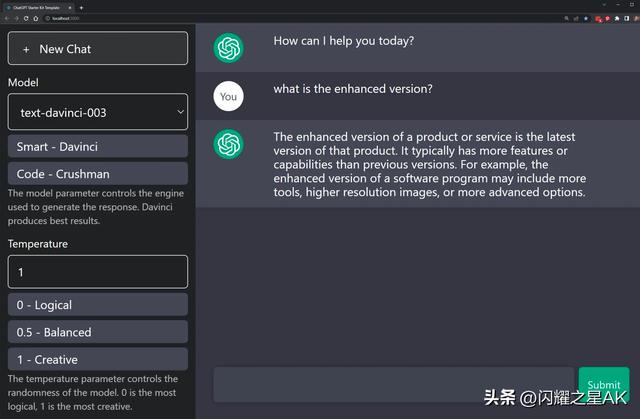
当从 API 请求时,我们必须向他们提供一些参数,包括我们要发送的model、temperature、max_tokens 等。
request : { model: "text-davinci-003", prompt: "", temperature: 0.9, max_tokens: 150, top_p: 1, frequency_penalty: 0, presence_penalty: 0.6, stop: [" Human:", " AI:"], }要了解更多信息,请访问OpenAI 网站。这基本上就是您如何通过更改模型来控制哪个模型完成您的请求。
OpenAI 提供了一个Playground,您可以在其中测试和使用这些设置,然后再将它们放入您的应用程序中。
现在,我们想要针对 3 种不同的角色进行 3 种不同的设置,AI 助手,英语翻译,以及图像生成器。让我们创建一个数组,我们可以在其中保存所有这些设置。
将以下代码放入您的app/page.js文件中:
const promptList = [ { name: "AI assistant", request : { model: "text-davinci-003", prompt: "", temperature: 0.9, max_tokens: 150, top_p: 1, frequency_penalty: 0, presence_penalty: 0.6, stop: [" Human:", " AI:"], } }, { name: "English to other languages", request: { model: "text-davinci-003", prompt: "", temperature: 0.1, max_tokens: 200, top_p: 1.0, frequency_penalty: 0.0, presence_penalty: 0.0, } }, { name: "Image generator", request: { prompt: "", n: 1, size: "512x512", } }] export {promptList};现在你app/page.js应该看起来像这样:
import Chat from "@/components/chat";import Head from "next/head";import custombg from "/styles/bg.module.css";const promptList = [ { name: "AI assistant", request : { model: "text-davinci-003", prompt: "", temperature: 0.9, max_tokens: 150, top_p: 1, frequency_penalty: 0, presence_penalty: 0.6, stop: [" Human:", " AI:"], } }, { name: "English to other languages", request: { model: "text-davinci-003", prompt: "", temperature: 0.1, max_tokens: 200, top_p: 1.0, frequency_penalty: 0.0, presence_penalty: 0.0, } }, { name: "Image generator", request: { prompt: "", n: 1, size: "512x512", } }] export {promptList}; export default function Home() { return ( <> {/* Head */} <Head> <title>ChatGPT</title> </Head> {/* Main */} <div className={`w-full min-h-full ${custombg.customBg}`}> <div className="flex"> {/* Sidebar */} <div className="bg-gray-800 h-screen w-1/5 p-2"> <div> {/* New chat */} <div> <div className="text-gray-100 flex items-center text-xl p-3 bg-gray-900 rounded-md border border-slate-600 shadow-md m-1 hover:bg-gray-700" onClick=""> <svg xmlns="http://www.w3.org/2000/svg" fill="none" viewBox="0 0 24 24" strokeWidth={1.5} stroke="currentColor" className="w-6 h-6"> <path strokeLinecap="round" strokeLinejoin="round" d="M12 6v12m6-6H6" /> </svg> <h2 className="text-sm px-1"> New chat </h2> </div> </div> {/* Prompts */} <div> <h2 className="text-sm px-2 py-1 text-gray-100"> Prompt options: </h2> <div className="p-1 flex justify-center"> <select onChange="" className="form-select appearance-none block w-full px-3 py-1.5 text-gray-100 bg-gray-900 bg-clip-padding bg-no-repeat border border-slate-600 rounded transition ease-in-out m-0 focus:text-gray-100 focus:bg-gray-900 focus:border-slate-600 focus:outline-none"> {/* Prompts select button */} </select> </div> </div> </div> </div> {/* Main area */} <div className="w-4/5 relative"> {/* Chat area */} <div id="chat" className="h-[90vh] overflow-auto scrollbar"> <Chat/> </div> {/* Text input area */} <div> <div className="p-5 absolute bottom-0 right-0 left-0"> <div className="flex justify-center mb-2"> {/* ClocLoader */} </div> <form className="relative" onSubmit=""> <input type="text" placeholder= "Start chatting" value="" required onChange="" rows="1" className="block p-2.5 w-full text-sm text-gray-50 bg-gray-700 rounded-lg focus:outline-none ring-gray-500 focus:border-gray-500 shadow-md" /> <button type="submit" className="right-2 bottom-3 absolute pr-2" > <svg xmlns="http://www.w3.org/2000/svg" viewBox="0 0 20 20" fill="gray" className="w-5 h-5"> <path d="M3.105 2.289a.75.75 0 00-.826.95l1.414 4.925A1.5 1.5 0 005.135 9.25h6.115a.75.75 0 010 1.5H5.135a1.5 1.5 0 00-1.442 1.086l-1.414 4.926a.75.75 0 00.826.95 28.896 28.896 0 0015.293-7.154.75.75 0 000-1.115A28.897 28.897 0 003.105 2.289z" /> </svg> </button> </form> </div> </div> </div> </div> </div> </> )}有了提示列表后,让我们创建一个组件,我们可以在其中一次选择一个提示。创建一个新文件components/prompts.js 并粘贴以下代码:
import { promptList} from "@/app/page"export default function Prompts() { return ( <> {promptList.map((prompt) => ( <option key={prompt.name} value={prompt.name}>{prompt.name}</option> ))} </> )}这段代码中发生的事情是它导出一个功能组件“Prompts”,它以下拉菜单的形式返回一个选项列表。
此代码的结果将是一个显示提示列表的下拉菜单,每个提示都是菜单中的一个选项。
在 中app/page.js,我们现在可以添加Prompts组件:
在顶部导入组件app/page.js然后添加组件:
import Prompts from "@/components/prompts";<div className="p-1 flex justify-center"> <select onChange="" className="form-select appearance-none block w-full px-3 py-1.5 text-gray-100 bg-gray-900 bg-clip-padding bg-no-repeat border border-slate-600 rounded transition ease-in-out m-0 focus:text-gray-100 focus:bg-gray-900 focus:border-slate-600 focus:outline-none"> {/* Prompts select button */} <Prompts/> //<--- Where you add the component </select></div>现在您可以使用选择按钮。
当我们输入提示时,需要接受输入并处理提交事件。将代码替换<form>为以下代码:
<form className="relative" onSubmit=""> <input type="text" placeholder= {generatePlaceholder(currentPrompt)} value={userInput} required onChange={(e)=>setUserInput(e.target.value)} rows="1" className="block p-2.5 w-full text-sm text-gray-50 bg-gray-700 rounded-lg focus:outline-none ring-gray-500 focus:border-gray-500 shadow-md" /> <button type="submit" className="right-2 bottom-3 absolute pr-2" > <svg xmlns="http://www.w3.org/2000/svg" viewBox="0 0 20 20" fill="gray" className="w-5 h-5"> <path d="M3.105 2.289a.75.75 0 00-.826.95l1.414 4.925A1.5 1.5 0 005.135 9.25h6.115a.75.75 0 010 1.5H5.135a1.5 1.5 0 00-1.442 1.086l-1.414 4.926a.75.75 0 00.826.95 28.896 28.896 0 0015.293-7.154.75.75 0 000-1.115A28.897 28.897 0 003.105 2.289z" /> </svg> </button></form>我们更新了form属性以使其在我们提交一些文本时执行某些操作。
现在,让我们声明使其工作所需的所有状态和函数。
在函数下导入声明mesages useState Hook export default function Home(),创建一个clearChat函数。
如果您对将此代码放在哪里感到困惑,请不要担心,我会向您展示整个代码,当一切正常时您的代码应该是什么样子。
import { useState } from "react";//...codeexport default function Home() { // Save and set conversation const [messages, setMessages] = useState([]); // Set a new chat function clearChat() { setMessages([]); }}clearChat在新建聊天按钮事件处理程序中调用该函数onClick。
{/* New chat */}<div> <div className="text-gray-100 flex items-center text-xl p-3 bg-gray-900 rounded-md border border-slate-600 shadow-md m-1 hover:bg-gray-700" onClick={clearChat}> <svg xmlns="http://www.w3.org/2000/svg" fill="none" viewBox="0 0 24 24" strokeWidth={1.5} stroke="currentColor" className="w-6 h-6"> <path strokeLinecap="round" strokeLinejoin="round" d="M12 6v12m6-6H6" /> </svg> <h2 className="text-sm px-1"> New chat </h2> </div></div>但是当您点击新的聊天按钮时什么也不会发生,因为我们还没有任何聊天。在本教程的后面部分,您将看到它的实际效果。
让我们在 currentPrompt useState 下声明 Hookexport default function Home()并创建一个SetPromptandgeneratePlaceholder函数。
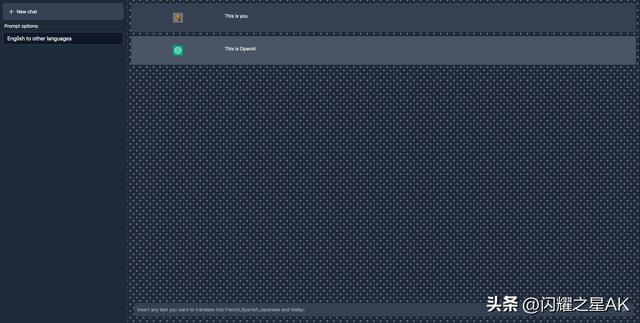
// To generate placeholderfunction generatePlaceholder(currentPrompt) { switch(currentPrompt) { case promptList[0].name: return "Start chatting" case promptList[1].name: return "Insert any text you want to translate into French,Spanish,Japanese and Malay: " case promptList[2].name: return "Insert your prompt to generate image:" default: return "Start chatting." }}export default function Home() { // .....code // Save and set current prompt const [currentPrompt, setCurrentPrompt] = useState(`AI assistant`); // .... code // Set prompt function setPrompt(event) { event.preventDefault(); clearChat(); setCurrentPrompt(event.target.value); }}setPrompt在选择按钮事件处理程序中调用函数onchange。
<select onChange={setPrompt} className="form-select appearance-none block w-full px-3 py-1.5 text-gray-100 bg-gray-900 bg-clip-padding bg-no-repeat border border-slate-600 rounded transition ease-in-out m-0 focus:text-gray-100 focus:bg-gray-900 focus:border-slate-600 focus:outline-none"> {/* Prompts select button */} <Prompts/></select>现在,当您选择不同的提示选项时,您将看到占位符根据所选提示发生变化。
如果它仍然不工作,你的当前app/page.js应该是这样的:
import Chat from "@/components/chat";import Prompts from "@/components/prompts";import Head from "next/head";import custombg from "/styles/bg.module.css";import { useState } from "react";const promptList = [ { name: "AI assistant", request : { model: "text-davinci-003", prompt: "", temperature: 0.9, max_tokens: 150, top_p: 1, frequency_penalty: 0, presence_penalty: 0.6, stop: [" Human:", " AI:"], } }, { name: "English to other languages", request: { model: "text-davinci-003", prompt: "", temperature: 0.1, max_tokens: 200, top_p: 1.0, frequency_penalty: 0.0, presence_penalty: 0.0, } }, { name: "Image generator", request: { prompt: "", n: 1, size: "512x512", } }]export {promptList}; // To generate placeholderfunction generatePlaceholder(currentPrompt) { switch(currentPrompt) { case promptList[0].name: return "开始聊天" case promptList[1].name: return "请插入您想要翻译成中文、西班牙语、日语和马来语的任何文本 " case promptList[2].name: return "请插入您的提示来生成图像" default: return "开始聊天" }}export default function Home() { // Save and set conversation const [messages, setMessages] = useState([]); // Save and set current prompt const [currentPrompt, setCurrentPrompt] = useState(`AI assistant`); // Save and set userinput const [userInput,setUserInput] = useState(""); // Set a new chat function clearChat() { setMessages([]); } // Set prompt function setPrompt(event) { event.preventDefault(); clearChat(); setCurrentPrompt(event.target.value); } return ( <> {/* Head */} <Head> <title>ChatGPT</title> </Head> {/* Main */} <div className={`w-full min-h-full ${custombg.customBg}`}> <div className="flex"> {/* Sidebar */} <div className="bg-gray-800 h-screen w-1/5 p-2"> <div> {/* New chat */} <div> <div className="text-gray-100 flex items-center text-xl p-3 bg-gray-900 rounded-md border border-slate-600 shadow-md m-1 hover:bg-gray-700" onClick={clearChat}> <svg xmlns="http://www.w3.org/2000/svg" fill="none" viewBox="0 0 24 24" strokeWidth={1.5} stroke="currentColor" className="w-6 h-6"> <path strokeLinecap="round" strokeLinejoin="round" d="M12 6v12m6-6H6" /> </svg> <h2 className="text-sm px-1"> New chat </h2> </div> </div> {/* Prompts */} <div> <h2 className="text-sm px-2 py-1 text-gray-100"> Prompt options: </h2> <div className="p-1 flex justify-center"> <select onChange={setPrompt} className="form-select appearance-none block w-full px-3 py-1.5 text-gray-100 bg-gray-900 bg-clip-padding bg-no-repeat border border-slate-600 rounded transition ease-in-out m-0 focus:text-gray-100 focus:bg-gray-900 focus:border-slate-600 focus:outline-none"> {/* Prompts select button */} <Prompts/> </select> </div> </div> </div> </div> {/* Main area */} <div className="w-4/5 relative"> {/* Chat area */} <div id="chat" className="h-[90vh] overflow-auto scrollbar"> <Chat/> </div> {/* Text input area */} <div> <div className="p-5 absolute bottom-0 right-0 left-0"> <div className="flex justify-center mb-2"> {/* ClocLoader */} </div> <form className="relative" onSubmit=""> <input type="text" placeholder= {generatePlaceholder(currentPrompt)} value={userInput} required onChange={(e)=>setUserInput(e.target.value)} rows="1" className="block p-2.5 w-full text-sm text-gray-50 bg-gray-700 rounded-lg focus:outline-none ring-gray-500 focus:border-gray-500 shadow-md" /> <button type="submit" className="right-2 bottom-3 absolute pr-2" > <svg xmlns="http://www.w3.org/2000/svg" viewBox="0 0 20 20" fill="gray" className="w-5 h-5"> <path d="M3.105 2.289a.75.75 0 00-.826.95l1.414 4.925A1.5 1.5 0 005.135 9.25h6.115a.75.75 0 010 1.5H5.135a1.5 1.5 0 00-1.442 1.086l-1.414 4.926a.75.75 0 00.826.95 28.896 28.896 0 0015.293-7.154.75.75 0 000-1.115A28.897 28.897 0 003.105 2.289z" /> </svg> </button> </form> </div> </div> </div> </div> </div> </> )}这个函数将成为一个async函数。因为我们要从这里获取 API,它允许我们的应用程序在等待这个异步函数的结果时继续处理其他任务。
在Home函数下,让我们创建一个名为 的函数submit。
export default function Home() { // .....code // Handle submit async function submit(event) { event.preventDefault(); } // .....code}不要忘记为标记onSubmit中的事件处理程序调用此函数<form>
// .....code<form className="relative" onSubmit={submit}>// .....code收到输入后,我们要做的下一件事是在聊天区域中显示它们。首先,我们要区分哪个是我们,哪个是OpenAI。让我们为此声明一个对象。
export default function Home() { // .....code // message type const messageType = {me: "me", openAI: "openAI"}; // .....code}接下来,我们现在可以保存userInput进入messages状态。
// Handle submit async function submit(event) { event.preventDefault(); // temporary let tempMessages = [...messages, {user: `${messageType.me}`, message: `${userInput}`}]; // put the userInput in the messages setMessages(tempMessages); // clear user input setUserInput(""); }打开components/chat.js并用此代码替换所有内容:
import Image from "next/image";import profilePic from "/public/user.png";import openAIPic from "/public/openai.png";export default function Chat({user}) { return ( <div id="chat" className={`flex justify-center m-3 pr-28 py-7 rounded-md ${user.user === "me" ? "bg-gray-700" : "bg-gray-600"} `}> <div className="w-1/5"> <Image src= {user.user === "me" ? profilePic : openAIPic} className="ml-auto mr-auto rounded-sm" alt="picture of you" width={30} height={30} /> </div> <div className="w-4/5 text-gray-100 text-sm" style={{whiteSpace: 'pre-wrap'}}> {user.image ? <img src={user.image}/> : user.message} </div> </div> )}在page.js我们应该检查是否有至少一条消息显示在聊天区域中。然后我们遍历每条消息并user 作为道具传递到聊天组件中。将 中的所有内容替换{/* Chat area */} 为以下代码:
{/* Chat area */}<div id="chat" className="h-[90vh] overflow-auto scrollbar"> {messages.length > 0 && messages.map((user, index)=>( <Chat key={index} user={user}/> )) }</div>如果一切都正确完成,您现在可以输入一些消息,它们将出现在聊天区域中。此外,当您单击新聊天时,它会重置聊天区域以进行新对话。
这是供您参考的完整app/page.js代码:
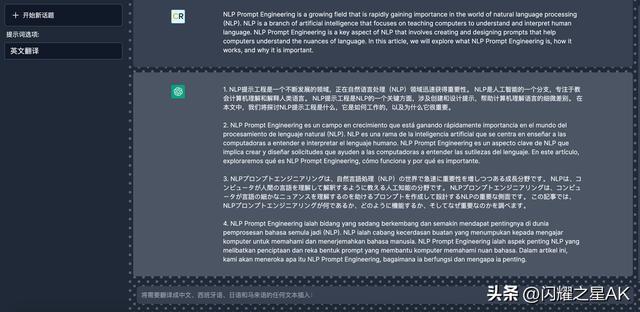
import Chat from "@/components/chat";import Prompts from "@/components/prompts";import Head from "next/head";import custombg from "/styles/bg.module.css";import { useState } from "react";const promptList = [ { name: "AI 助手", request : { model: "text-davinci-003", prompt: "", temperature: 0.9, max_tokens: 150, top_p: 1, frequency_penalty: 0, presence_penalty: 0.6, stop: [" Human:", " AI:"], } }, { name: "英文翻译", request: { model: "text-davinci-003", prompt: "", temperature: 0.1, max_tokens: 200, top_p: 1.0, frequency_penalty: 0.0, presence_penalty: 0.0, } }, { name: "图像生成", request: { prompt: "", n: 1, size: "512x512", } }]export {promptList}; // To generate placeholderfunction generatePlaceholder(currentPrompt) { switch(currentPrompt) { case promptList[0].name: return "开始聊天" case promptList[1].name: return "请插入您想要翻译成中文、西班牙语、日语和马来语的任何文本 " case promptList[2].name: return "请插入您的提示来生成图像" default: return "开始聊天" }}export default function Home() { // Save and set conversation const [messages, setMessages] = useState([]); // Save and set current prompt const [currentPrompt, setCurrentPrompt] = useState(`AI assistant`); // Save and set userinput const [userInput,setUserInput] = useState(""); // message type const messageType = {me: "me", openAI: "openAI"}; // Set a new chat function clearChat() { setMessages([]); } // Set prompt function setPrompt(event) { event.preventDefault(); clearChat(); setCurrentPrompt(event.target.value); } // Handle submit async function submit(event) { event.preventDefault(); // temporary message let tempMessages = [...messages, {user: `${messageType.me}`, message: `${userInput}`}]; // put the userInput in the messages setMessages(tempMessages); // clear user input setUserInput(""); } return ( <> {/* Head */} <Head> <title>ChatGPT</title> </Head> {/* Main */} <div className={`w-full min-h-full ${custombg.customBg}`}> <div className="flex"> {/* Sidebar */} <div className="bg-gray-800 h-screen w-1/5 p-2"> <div> {/* New chat */} <div> <div className="text-gray-100 flex items-center text-xl p-3 bg-gray-900 rounded-md border border-slate-600 shadow-md m-1 hover:bg-gray-700" onClick={clearChat}> <svg xmlns="http://www.w3.org/2000/svg" fill="none" viewBox="0 0 24 24" strokeWidth={1.5} stroke="currentColor" className="w-6 h-6"> <path strokeLinecap="round" strokeLinejoin="round" d="M12 6v12m6-6H6" /> </svg> <h2 className="text-sm px-1"> New chat </h2> </div> </div> {/* Prompts */} <div> <h2 className="text-sm px-2 py-1 text-gray-100"> Prompt options: </h2> <div className="p-1 flex justify-center"> <select onChange={setPrompt} className="form-select appearance-none block w-full px-3 py-1.5 text-gray-100 bg-gray-900 bg-clip-padding bg-no-repeat border border-slate-600 rounded transition ease-in-out m-0 focus:text-gray-100 focus:bg-gray-900 focus:border-slate-600 focus:outline-none"> {/* Prompts select button */} <Prompts/> </select> </div> </div> </div> </div> {/* Main area */} <div className="w-4/5 relative"> {/* Chat area */} <div id="chat" className="h-[90vh] overflow-auto scrollbar"> {messages.length > 0 && messages.map((user, index)=>( <Chat key={index} user={user}/> )) } </div> {/* Text input area */} <div> <div className="p-5 absolute bottom-0 right-0 left-0"> <div className="flex justify-center mb-2"> {/* ClocLoader */} </div> <form className="relative" onSubmit={submit}> <input type="text" placeholder= {generatePlaceholder(currentPrompt)} value={userInput} required onChange={(e)=>setUserInput(e.target.value)} rows="1" className="block p-2.5 w-full text-sm text-gray-50 bg-gray-700 rounded-lg focus:outline-none ring-gray-500 focus:border-gray-500 shadow-md" /> <button type="submit" className="right-2 bottom-3 absolute pr-2" > <svg xmlns="http://www.w3.org/2000/svg" viewBox="0 0 20 20" fill="gray" className="w-5 h-5"> <path d="M3.105 2.289a.75.75 0 00-.826.95l1.414 4.925A1.5 1.5 0 005.135 9.25h6.115a.75.75 0 010 1.5H5.135a1.5 1.5 0 00-1.442 1.086l-1.414 4.926a.75.75 0 00.826.95 28.896 28.896 0 0015.293-7.154.75.75 0 000-1.115A28.897 28.897 0 003.105 2.289z" /> </svg> </button> </form> </div> </div> </div> </div> </div> </> )}首先,我们必须从稍后创建的服务器端调用 API。在app/page.js找到这行代码:
// Handle submitasync function submit(event) { // .....code}用以下代码替换它们:
// Handle submit async function submit(event) { event.preventDefault(); // Get instruction prompt const instructionPrompt = generateInstructionPrompt(userInput, currentPrompt) // Temporary message let tempMessages = [...messages, {user: `${messageType.me}`, message: `${userInput}`}]; // Put the userInput in the messages setMessages(tempMessages); // Clear user input setUserInput(""); // Call the API try { const response = await fetch("api/generate",{ method: "POST", headers: { "Content-Type": "application/json", }, body: generateBody(currentPrompt, messages, userInput, tempMessages, instructionPrompt) }); // If we get unsuccessful response const data = await response.json(); if (response.status !== 200) { throw data.error || new Error(`Request failed with status ${response.status}`); } console.log(data.openAI); setMessages([...tempMessages, {user: messageType.openAI, message: `${data.openAI && data.openAI.trimStart()}`, image: data.image }]); } catch (error) { // Consider implementing your own error handling logic here console.error(error); alert(error.message); } }OpenAI 模型可以做任何事情,从生成原创故事到执行复杂的文本分析。因为他们可以做很多事情,所以你必须明确描述你想要什么。展示,而不仅仅是讲述,通常是获得良好提示的秘诀。这些模型可以用作您自己模型的起点,或者您可以微调它们以满足您的特定需求。
所以我们必须向他们展示我们希望模型为我们做什么。这些是如何明确地给他们指示的一些例子。
在 index.js 你可以将它们放在数组下的代码中添加以下代码prompList:
function generateInstructionPrompt(userInput, currentPrompt) { let instructionPrompt = ``; switch (currentPrompt) { case promptList[0].name: instructionPrompt = `The following is a conversation with an AI assistant. The assistant is helpful, creative, clever, and very friendly. \nHuman: Hello, who are you? \nAI: I am an AI created by OpenAI. How can I help you today? \nHuman: ${userInput} \nAI:` break; case promptList[1].name: instructionPrompt = `Translate this into four languages 1. French, 2. Spanish, 3. Japanese and 4. Malay:\n\n${userInput}\n\n` break; case promptList[2].name: instructionPrompt = `${userInput}` break; default: instructionPrompt = `The following is a conversation with an AI assistant. The assistant is helpful, creative, clever, and very friendly. \n\nHuman: Hello, who are you? \nAI: I am an AI created by OpenAI. How can I help you today? \nHuman: ${userInput}` } return instructionPrompt;}generateInstructionPrompt功能。
此代码定义了一个函数generateInstructionPrompt,该函数根据用户选择的当前提示和用户输入生成指令提示。该函数有两个参数:userInput和currentPrompt。
该函数以空字符串开头instructionPrompt,然后使用语句根据 的值switch设置 的值。该语句将 的值与数组中提示的名称进行比较。instructionPromptcurrentPromptswitchcurrentPromptpromptList
最后,该函数返回instructionPrompt.
当我们向 API 发送请求时,不同的提示需要不同的主体。所以我们必须创建一个函数来为每个提示生成一个特定的正文。
添加以下代码,page.js 您可以将它们放在generateInstructionPrompt函数下:
function generateBody(currentPrompt, messages, userInput, tempMessages, instructionPrompt) { let body = ""; switch(currentPrompt) { case promptList[0].name: body = JSON.stringify({input: `${messages.length === 0 ? instructionPrompt : tempMessages.map(m => m.message).join(" ")}`, prompt: currentPrompt}) break; case promptList[1].name: body = JSON.stringify({input: instructionPrompt, prompt: currentPrompt}) case promptList[2].name: body = JSON.stringify({input: instructionPrompt, prompt: currentPrompt}) break; default: body = JSON.stringify({input: `${messages.length === 0 ? instructionPrompt : tempMessages.map(m => m.message).join(" ")}`, prompt: currentPrompt}) } return body}generateBody功能。
该函数生成要在 API 调用中使用的请求正文fetch。body是根据其值生成的,currentPrompt用于判断API调用的提示类型。
它使用 switch 语句来确定提示的类型。如果currentPrompt等于promptList[0].name,正文将设置为具有以下属性的 JSON 字符串:
如果currentPrompt等于promptList[1].nameor promptList[2].name,正文将设置为具有以下属性的 JSON 字符串:
如果currentPrompt不匹配任何一种情况,正文将设置为具有以下属性的 JSON 字符串:
最后,该函数返回生成的body.
首先,我们需要安装 OpenAI 官方 Node.js 库以通过 HTTP 请求与 API 进行交互。在终端中运行此命令:
npm install openai如果您不知道,文件夹内的任何文件app/api都会映射到/api/*并将被视为 API 端点而不是app. 它们是仅限服务器端的捆绑包,不会增加客户端捆绑包的大小。
这是我们要向 OpenAI API 发出请求的地方。让我们创建一个新文件app/api/generate.js并使用以下内容填充它:
import { Configuration, OpenAIApi } from "openai";import { promptList} from "@/app/page"const configuration = new Configuration({ apiKey: process.env.OPENAI_API_KEY,});// using the secret key for authenticationconst openai = new OpenAIApi(configuration);// the function is called from index.js when it fetch(api/generate)export default async function(req, res) { if (!configuration.apiKey) { res.status(500).json({ error: { message: "OpenAI API key not configured, please follow instructions in README.md", } }); return; } // Get input and currentPrompt const { input, prompt } = req.body; const APIrequest = generateAPIrequest(prompt,input); // If current prompt is Image generator if(prompt === "Image generator") { // Request OpenAI API try { const response = await openai.createImage(APIrequest); res.status(200).json({image:response.data.data[0].url}) } catch(error) { // Consider adjusting the error handling logic for your use case if(error.response){ console.error(error.response.data, error.response.status); res.status(error.response.status).json(error.response.data); } else { console.log(`Error with OpenAI API request: ${error.message}`); res.status(500).json({ error: { message: 'An error occurred during your request.', } }); } } return; } // Request OpenAI API if current prompt is not Image generator try { const response = await openai.createCompletion(APIrequest); res.status(200).json({openAI:response.data.choices[0].text}) } catch(error) { // Consider adjusting the error handling logic for your use case if(error.response){ console.error(error.response.data, error.response.status); res.status(error.response.status).json(error.response.data); } else { console.log(`Error with OpenAI API request: ${error.message}`); res.status(500).json({ error: { message: 'An error occurred during your request.', } }); } }}// Selecting which request to send based on current prompt and injecting user input into the requestfunction generateAPIrequest(currentPrompt, input) { let request = {}; for(let i = 0; i < promptList.length; i ++) { if(currentPrompt === promptList[i].name) { promptList[i].request.prompt = input; request = promptList[i].request; } } return request;}现在一切正常!去尝试使用该应用程序。
对于最后的润色,我们将添加自动滚动和加载动画,使该应用程序更加生动。
为了快速完成所有操作,让我们使用终端安装 react-scroll:
npm install react-scroll并在中添加以下代码app/page.js:
import { useEffect } from "react";import { animateScroll as scroll } from 'react-scroll';//....codeexport default function Home() {//.....code useEffect(() => { scroll.scrollToBottom({ containerId: "chat", duration: 250, }); }, [messages])//.....code}这是可选的,只是为了使滚动条与设计保持一致。
打开styles/globals.css以下代码:
@tailwind base;@tailwind components;@tailwind utilities;@layer utilities { .scrollbar::-webkit-scrollbar { width: 10px; height: 10px; } .scrollbar::-webkit-scrollbar-track { background: #1F2937; } .scrollbar::-webkit-scrollbar-thumb { background: #374151; border-radius: 100vh; } .scrollbar::-webkit-scrollbar-thumb:hover { background: #4B5563; }}接下来也是最后一件事是加载动画。我们将使用David Hu 的 React Spinners。去他的页面查看更多加载动画。对于本教程,我们将使用 CloakLoader 动画。
使用此命令安装 React Spinners:
npm install --save react-spinners然后我们声明loadinguseState Hook:
export default function Home() { // loading useState const [loading, setLoading] = useState(false); //.....code}我们希望加载动画在请求发生时为真。因此,我们在提交时将其设置为 true,然后在收到响应(成功或错误)时将其设置回 false。
在app/page.js找到以下行并根据此代码设置加载动画:
// Handle submit async function submit(event) { event.preventDefault(); // Set loading animation to true setLoading(true); //.....code try { //....code // Set loading animation to false setLoading(false); } catch (error) { // Set loading animation to false setLoading(false); //.....code }}最后一步是添加加载组件。找到这一{/* ClocLoader */}行并添加组件。
import { ClockLoader } from 'react-spinners';//....code//....code//....code<div className="flex justify-center mb-2"> {/* ClocLoader */} <ClockLoader size={20} color={"#F3F4F6"} loading={loading} /></div>您现在可以尝试一下,以确保它正常工作。
给你!我们终于完成了应用程序。如果您还在这里,感谢您花时间阅读本教程。我希望您对代码及其功能有了更深入的了解。如果您有任何问题或疑虑,请随时与我联系。我总是很乐意提供帮助。我希望本教程对您来说是宝贵的资源,并且您可以充分利用新学到的知识。干杯!
如果它仍然无法正常工作。这是供您参考的完整代码。(接下来js文件结构)
import Chat from "@/components/chat";import Prompts from "@/components/prompts";import Head from "next/head";import custombg from "/styles/bg.module.css";import { useState } from "react";import { useEffect } from "react";import { animateScroll as scroll } from 'react-scroll';import { ClockLoader } from 'react-spinners';const promptList = [ { name: "AI assistant", request : { model: "text-davinci-003", prompt: "", temperature: 0.9, max_tokens: 150, top_p: 1, frequency_penalty: 0, presence_penalty: 0.6, stop: [" Human:", " AI:"], } }, { name: "English to other languages", request: { model: "text-davinci-003", prompt: "", temperature: 0.1, max_tokens: 200, top_p: 1.0, frequency_penalty: 0.0, presence_penalty: 0.0, } }, { name: "Image generator", request: { prompt: "", n: 1, size: "512x512", } }]export {promptList}; // Generate instruction promptfunction generateInstructionPrompt(userInput, currentPrompt) { let instructionPrompt = ``; switch (currentPrompt) { case promptList[0].name: instructionPrompt = `The following is a conversation with an AI assistant. The assistant is helpful, creative, clever, and very friendly. \nHuman: Hello, who are you? \nAI: I am an AI created by OpenAI. How can I help you today? \nHuman: ${userInput} \nAI:` break; case promptList[1].name: instructionPrompt = `Translate this into four languages 1. French, 2. Spanish, 3. Japanese and 4. Malay:\n\n${userInput}\n\n` break; case promptList[2].name: instructionPrompt = `${userInput}` break; default: instructionPrompt = `The following is a conversation with an AI assistant. The assistant is helpful, creative, clever, and very friendly. \n\nHuman: Hello, who are you? \nAI: I am an AI created by OpenAI. How can I help you today? \nHuman: ${userInput}` } return instructionPrompt;}// Generate bodyfunction generateBody(currentPrompt, messages, userInput, tempMessages, instructionPrompt) { let body = ""; switch(currentPrompt) { case promptList[0].name: body = JSON.stringify({input: `${messages.length === 0 ? instructionPrompt : tempMessages.map(m => m.message).join(" ")}`, prompt: currentPrompt}) break; case promptList[1].name: body = JSON.stringify({input: instructionPrompt, prompt: currentPrompt}) case promptList[2].name: body = JSON.stringify({input: instructionPrompt, prompt: currentPrompt}) break; default: body = JSON.stringify({input: `${messages.length === 0 ? instructionPrompt : tempMessages.map(m => m.message).join(" ")}`, prompt: currentPrompt}) } return body}// To generate placeholderfunction generatePlaceholder(currentPrompt) { switch(currentPrompt) { case promptList[0].name: return "Start chatting" case promptList[1].name: return "Insert any text you want to translate into French,Spanish,Japanese and Malay: " case promptList[2].name: return "Insert your prompt to generate image:" default: return "Start chatting." }}export default function Home() { // loading useState const [loading, setLoading] = useState(false); // Save and set conversation const [messages, setMessages] = useState([]); // Save and set current prompt const [currentPrompt, setCurrentPrompt] = useState(`AI assistant`); // Save and set userinput const [userInput,setUserInput] = useState(""); // Message type const messageType = {me: "me", openAI: "openAI"}; // Scroll the chat container to the bottom useEffect(() => { scroll.scrollToBottom({ containerId: "chat", duration: 250, }); }, [messages]) // Set a new chat function clearChat() { setMessages([]); } // Set prompt function setPrompt(event) { event.preventDefault(); clearChat(); setCurrentPrompt(event.target.value); } // Handle submit async function submit(event) { event.preventDefault(); // Set loading animation to true setLoading(true); // Get instruction prompt const instructionPrompt = generateInstructionPrompt(userInput, currentPrompt) // Temporary message let tempMessages = [...messages, {user: `${messageType.me}`, message: `${userInput}`}]; // Put the userInput in the messages setMessages(tempMessages); // Clear user input setUserInput(""); // Call the API try { const response = await fetch("api/generate",{ method: "POST", headers: { "Content-Type": "application/json", }, body: generateBody(currentPrompt, messages, userInput, tempMessages, instructionPrompt) }); // If we get unsuccessful response const data = await response.json(); if (response.status !== 200) { throw data.error || new Error(`Request failed with status ${response.status}`); } setMessages([...tempMessages, {user: messageType.openAI, message: `${data.openAI && data.openAI.trimStart()}`, image: data.image }]); // Set loading animation to false setLoading(false); } catch (error) { // Set loading animation to false setLoading(false); // Consider implementing your own error handling logic here console.error(error); alert(error.message); } } return ( <> {/* Head */} <Head> <title>ChatGPT</title> </Head> {/* Main */} <div className={`w-full min-h-full ${custombg.customBg}`}> <div className="flex"> {/* Sidebar */} <div className="bg-gray-800 h-screen w-1/5 p-2"> <div> {/* New chat */} <div> <div className="text-gray-100 flex items-center text-xl p-3 bg-gray-900 rounded-md border border-slate-600 shadow-md m-1 hover:bg-gray-700" onClick={clearChat}> <svg xmlns="http://www.w3.org/2000/svg" fill="none" viewBox="0 0 24 24" strokeWidth={1.5} stroke="currentColor" className="w-6 h-6"> <path strokeLinecap="round" strokeLinejoin="round" d="M12 6v12m6-6H6" /> </svg> <h2 className="text-sm px-1"> New chat </h2> </div> </div> {/* Prompts */} <div> <h2 className="text-sm px-2 py-1 text-gray-100"> Prompt options: </h2> <div className="p-1 flex justify-center"> <select onChange={setPrompt} className="form-select appearance-none block w-full px-3 py-1.5 text-gray-100 bg-gray-900 bg-clip-padding bg-no-repeat border border-slate-600 rounded transition ease-in-out m-0 focus:text-gray-100 focus:bg-gray-900 focus:border-slate-600 focus:outline-none"> {/* Prompts select button */} <Prompts/> </select> </div> </div> </div> </div> {/* Main area */} <div className="w-4/5 relative"> {/* Chat area */} <div id="chat" className="h-[90vh] overflow-auto scrollbar"> {messages.length > 0 && messages.map((user, index)=>( <Chat key={index} user={user}/> )) } </div> {/* Text input area */} <div> <div className="p-5 absolute bottom-0 right-0 left-0"> <div className="flex justify-center mb-2"> {/* ClocLoader */} <ClockLoader size={20} color={"#F3F4F6"} loading={loading} /> </div> <form className="relative" onSubmit={submit}> <input type="text" placeholder= {generatePlaceholder(currentPrompt)} value={userInput} required onChange={(e)=>setUserInput(e.target.value)} rows="1" className="block p-2.5 w-full text-sm text-gray-50 bg-gray-700 rounded-lg focus:outline-none ring-gray-500 focus:border-gray-500 shadow-md" /> <button type="submit" className="right-2 bottom-3 absolute pr-2" > <svg xmlns="http://www.w3.org/2000/svg" viewBox="0 0 20 20" fill="gray" className="w-5 h-5"> <path d="M3.105 2.289a.75.75 0 00-.826.95l1.414 4.925A1.5 1.5 0 005.135 9.25h6.115a.75.75 0 010 1.5H5.135a1.5 1.5 0 00-1.442 1.086l-1.414 4.926a.75.75 0 00.826.95 28.896 28.896 0 0015.293-7.154.75.75 0 000-1.115A28.897 28.897 0 003.105 2.289z" /> </svg> </button> </form> </div> </div> </div> </div> </div> </> )}import { Configuration, OpenAIApi } from "openai";import { promptList} from "@/app/page"const configuration = new Configuration({ apiKey: process.env.OPENAI_API_KEY,});// using the secret key for authenticationconst openai = new OpenAIApi(configuration);// the function is called from index.js when it fetch(api/generate)export default async function(req, res) { if (!configuration.apiKey) { res.status(500).json({ error: { message: "OpenAI API key not configured, please follow instructions in README.md", } }); return; } // Get input and currentPrompt const { input, prompt } = req.body; const APIrequest = generateAPIrequest(prompt,input); // If current prompt is Image generator if(prompt === "Image generator") { // Request OpenAI API try { const response = await openai.createImage(APIrequest); res.status(200).json({image:response.data.data[0].url}) } catch(error) { // Consider adjusting the error handling logic for your use case if(error.response){ console.error(error.response.data, error.response.status); res.status(error.response.status).json(error.response.data); } else { console.log(`Error with OpenAI API request: ${error.message}`); res.status(500).json({ error: { message: 'An error occurred during your request.', } }); } } return; } // Request OpenAI API if current prompt is not Image generator try { const response = await openai.createCompletion(APIrequest); res.status(200).json({openAI:response.data.choices[0].text}) } catch(error) { // Consider adjusting the error handling logic for your use case if(error.response){ console.error(error.response.data, error.response.status); res.status(error.response.status).json(error.response.data); } else { console.log(`Error with OpenAI API request: ${error.message}`); res.status(500).json({ error: { message: 'An error occurred during your request.', } }); } }}// Selecting which request to send based on current prompt and injecting user input into the requestfunction generateAPIrequest(currentPrompt, input) { let request = {}; for(let i = 0; i < promptList.length; i ++) { if(currentPrompt === promptList[i].name) { promptList[i].request.prompt = input; request = promptList[i].request; } } return request;}import Image from "next/image";import profilePic from "/public/user.png";import openAIPic from "/public/openai.png";export default function Chat({user}) { return ( <div id="chat" className={`flex justify-center m-3 pr-28 py-7 rounded-md ${user.user === "me" ? "bg-gray-700" : "bg-gray-600"} `}> <div className="w-1/5"> <Image src= {user.user === "me" ? profilePic : openAIPic} className="ml-auto mr-auto rounded-sm" alt="picture of you" width={30} height={30} /> </div> <div className="w-4/5 text-gray-100 text-sm" style={{whiteSpace: 'pre-wrap'}}> {user.image ? <img src={user.image}/> : user.message} </div> </div> )}import { promptList} from "@/pages"export default function Prompts() { return ( <> {promptList.map((prompt) => ( <option key={prompt.name} value={prompt.name}>{prompt.name}</option> ))} </> )}.customBg{ background-color: #1f2937; background-image: url("data:image/svg+xml,%3Csvg width='20' height='20' viewBox='0 0 20 20' xmlns='http://www.w3.org/2000/svg'%3E%3Cg fill='%239C92AC' fill-opacity='0.52' fill-rule='evenodd'%3E%3Ccircle cx='3' cy='3' r='3'/%3E%3Ccircle cx='13' cy='13' r='3'/%3E%3C/g%3E%3C/svg%3E"); }@tailwind base;@tailwind components;@tailwind utilities;@layer utilities { .scrollbar::-webkit-scrollbar { width: 10px; height: 10px; } .scrollbar::-webkit-scrollbar-track { background: #1F2937; } .scrollbar::-webkit-scrollbar-thumb { background: #374151; border-radius: 100vh; } .scrollbar::-webkit-scrollbar-thumb:hover { background: #4B5563; }}OPENAI_API_KEY=Your OpenAI secret keynpm run build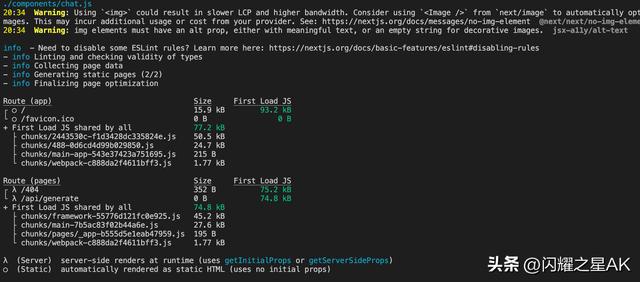
npm run start
访问本地3000端口,即可正常和GPT对话,目前功能比较简单,只实现了一个基本的对话聊天,主要给刚接入ChatGPT的技术人员一步步如何去实现提供一个模板和思路,后续可以逐步来扩展自己所需要的功能。

OpenAI API 入门简单明了。以下是启动和运行时可以遵循的步骤:
按照这些步骤,您可以快速轻松地开始使用 OpenAI API,并开始构建您自己的 AI 模型和应用程序!
OpenAI API 有几个关键组件,使其成为构建 AI 模型和应用程序的强大而灵活的平台。这些包括:
这些是 OpenAI API 的关键组件,它们使它成为构建 AI 模型和应用程序的强大且易于访问的平台。
声明:本站内容部分源于网络转载,出于传递更多信息之目的,并不意味着赞同其观点或证实其描述。文章内容仅供参考,请咨询相关专业人士。
如果无意之中侵犯了您的版权,或有意见、反馈或投诉等情况, 请联系本站,[qq:]
Copyright ©2024 编程密语 All rights reserved 版权所有 鲁ICP备09004228号-12
 鲁公网安备37020202000738号