不再困扰:终极CSS多边形绘制指南
发表时间: 2024-01-05 10:36
因为工作中遇到了需要绘制蜂巢效果的需求,所以我特地恶补了关于css绘制多边形的方案,目前找到的主流方案如下:
虽然这种方法很讨巧,的事实上这种方法被广泛运用在前端实践中。
<!DOCTYPE html><html lang="en"><head> <meta charset="UTF-8"> <meta name="viewport" content="width=device-width, initial-scale=1.0"> <style> body { display: grid; grid-template-columns: repeat(auto-fill, 100px); grid-gap: 5px; justify-content: center; padding: 20px; background-color: #f0f0f0; } .hexagon { position: relative; width: 100px; height: 57.74px; background-color: #ffd700; margin-bottom: -2px; box-shadow: 0 0 10px rgba(0, 0, 0, 0.3); /* 添加阴影效果 */ } .hexagon::before, .hexagon::after { content: ''; position: absolute; width: 0; border-left: 50px solid transparent; border-right: 50px solid transparent; } .hexagon::before { top: -27.87px; border-bottom: 28.87px solid #ffd700; } .hexagon::after { bottom: -27.87px; border-top: 28.87px solid #ffd700; } </style> <title>Honeycomb Effect with Shadow</title></head><body> <div class="hexagon" style="position: relative;"> </div> <div class="hexagon" style="position: relative;"> </div> <!-- 添加更多蜂巢元素... --></body></html>我们来看效果
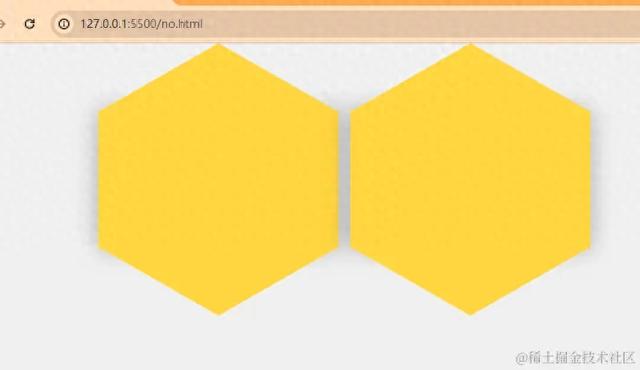
看起来效果不错,但是因为我要给多变形状添加阴影,而上下的三角形是border模拟出的没办法添加,如果强行添加就会变成这样。

这显然不是我想要的效果,所以第一种方案pass
事实正六边形可以抽象为3个长方形的旋转叠加,通过伪元素叠加就可以模拟出正六边形的效果。话不多说上代码
<!DOCTYPE html><html lang="en"> <head> <meta charset="UTF-8"> <meta name="viewport" content="width=device-width, initial-scale=1.0"> <meta http-equiv="X-UA-Compatible" content="ie=edge"> <script src="https://cdn.tailwindcss.com"></script> <title>Document</title> <style> .hexagon { width: 104px; height: 60px; position: relative; margin: 10px 40px; } .hexagon__item { width: 100%; height: 100%; background: blue; position: absolute; top: 30px; left: 0; visibility: hidden; overflow: hidden; } .hexagon__item_left { transform: rotate(-60deg); } .hexagon__item_right { transform: rotate(60deg); } .hexagon__item:before { position: absolute; top: 0; left: 0; content: ""; height: 130px; width: 100%; visibility: visible; background-color: #d9d32a; background-size: cover; transform-origin: 0 0; } .hexagon__item_left:before { transform: rotate(60deg) translateY(-70%); } .hexagon__item_right:before { transform: rotate(-60deg) translateX(-50%); } .hexagon__item_center:before { transform: translateY(-25%); } </style> </head> <body> <div class="flex"> <div class="hexagon"> <div class="hexagon__item hexagon__item_left"></div> <div class="hexagon__item hexagon__item_center"></div> <div class="hexagon__item hexagon__item_right"></div> </div> <div class="hexagon"> <div class="hexagon__item hexagon__item_left"></div> <div class="hexagon__item hexagon__item_center"></div> <div class="hexagon__item hexagon__item_right"></div> </div> <div class="hexagon"> <div class="hexagon__item hexagon__item_left"></div> <div class="hexagon__item hexagon__item_center"></div> <div class="hexagon__item hexagon__item_right"></div> </div> <div class="hexagon"> <div class="hexagon__item hexagon__item_left"></div> <div class="hexagon__item hexagon__item_center"></div> <div class="hexagon__item hexagon__item_right"></div> </div> </div> </body></html>效果如下:

哇非常的完美,似乎我应该选择它了。BUT!!!当我将视口缩小,长方形div大小响应性变短。

糟了,因为该方案采用了复杂的拼接方式,所以如果我希望保持每个六边形的形状在响应性界面中,我必须通过js计算获得要最新的 长度 定位关系,而这显然过于复杂,也违背了css实现的初衷。
clip-path 是一个用于裁剪元素形状的 CSS 属性,专门用来创造各种复杂的形状和效果。
drop-shadow 是 CSS 滤镜效果之一,用于为元素添加逼真的阴影效果。它使得开发者能够在元素的周围投射出模糊、透明的阴影,为页面元素增添立体感。
有了这两大神器,接下来就是秒杀时刻。上代码
<!DOCTYPE html><html lang="en"> <head> <meta charset="UTF-8"> <meta name="viewport" content="width=device-width, initial-scale=1.0"> <meta http-equiv="X-UA-Compatible" content="ie=edge"> <script src="https://cdn.tailwindcss.com"></script> <title>Document</title> <style> .btn-wrap { filter: drop-shadow(2px 4px 4px rgba(50, 50, 0, 0.39)) drop-shadow(-1px -1px 0px rgba(242, 4, 4, 0.5));}.menu-cell { text-align: center; background: #ffffff; z-index: 1; -webkit-clip-path: polygon(50% 0%, 100% 25%, 100% 75%, 50% 100%, 0% 75%, 0% 25%); clip-path: polygon(50% 0%, 100% 25%, 100% 75%, 50% 100%, 0% 75%, 0% 25%); height: 17.5vw; /* line-height: 175px; */ width: 15vw; margin: 6px; overflow: hidden; } </style> </head> <body> <div class="flex justify-start gap-x-3 "> <div class="btn-wrap"> <div class="menu-cell"> </div> </div> <div class="btn-wrap"> <div class="menu-cell"> </div> </div> <div class="btn-wrap"> <div class="menu-cell"> </div> </div> </body></html>效果如下:

完美完成要求。且通过单位设置便可实现响应式大小。
最后虽然clip-path与 drop-shadow 可以带来巨大的方便以及编码的简洁,但是它们的兼容性是开发中要注意的问题。
作者:pancilandtao
链接:
https://juejin.cn/post/7300779513910378507
声明:本站内容部分源于网络转载,出于传递更多信息之目的,并不意味着赞同其观点或证实其描述。文章内容仅供参考,请咨询相关专业人士。
如果无意之中侵犯了您的版权,或有意见、反馈或投诉等情况, 请联系本站,[qq:]
Copyright ©2024 编程密语 All rights reserved 版权所有 鲁ICP备09004228号-12
 鲁公网安备37020202000738号