
一、引言
有了自动配置,springboot使web开发变得简单,这个在springboot之旅中的第一篇中就有体现,实际的开发中当然不会这么简单,很多时候我们都需要自己去定制一些东西。web开发的东西比较多, 我们先掌握一些必要知识点,剩下的就是CRUD开发。
快速的创建一个springboot web项目在第一篇总结中有讲:
https://www.cnblogs.com/yuanqinnan/p/10604761.html
二、静态资源的映射规则
现在大部分公司都是前后端分离的开发模式,一般作为后台开发不用关心前端,只需要提供相应接口,但是有关前端的知识我们最好还是能基本掌握一些。我们先了一套bootstrap框架,然后开始进行开发。
在之前的web开发中,在main目录下面会有webapp文件夹,我们将所有的静态资源放在里面,但是springboot的默认生成中并没有这个文件夹,那么springboot是怎么映射静态资源。
ctrl+N快捷键,找到WebMvcAutoConfiguration类,再找到里面的addResourceHandlers 方法
public void addResourceHandlers(ResourceHandlerRegistry registry) { if (!this.resourceProperties.isAddMappings()) { logger.debug("Default resource handling disabled"); return; } Duration cachePeriod = this.resourceProperties.getCache().getPeriod(); CacheControl cacheControl = this.resourceProperties.getCache() .getCachecontrol().toHttpCacheControl(); //webjar形式 if (!registry.hasMappingForPattern("/webjars/**")) { customizeResourceHandlerRegistration(registry .addResourceHandler("/webjars/**") .addResourceLocations("classpath:/META-INF/resources/webjars/") .setCachePeriod(getSeconds(cachePeriod)) .setCacheControl(cacheControl)); } //匹配/** String staticPathPattern = this.mvcProperties.getStaticPathPattern(); if (!registry.hasMappingForPattern(staticPathPattern)) { customizeResourceHandlerRegistration( registry.addResourceHandler(staticPathPattern) .addResourceLocations(getResourceLocations( //映射的资源文件夹 this.resourceProperties.getStaticLocations())) .setCachePeriod(getSeconds(cachePeriod)) .setCacheControl(cacheControl)); }}2.1webjars
这里的代码告诉我们:如果是访问/webjars/**下的请求 ,都去
classpath:/META-INF/resources/webjars/ 找资源。webjars是指以jar包的方式引入静态资源。打开https://www.webjars.org/ ,可以找到我们前端开发常用的一些组件,我们选择相应的版本,例:
<dependency> <groupId>org.webjars</groupId> <artifactId>jquery</artifactId> <version>3.3.1-1</version></dependency>引入后可以看到jquer文件被引入了:
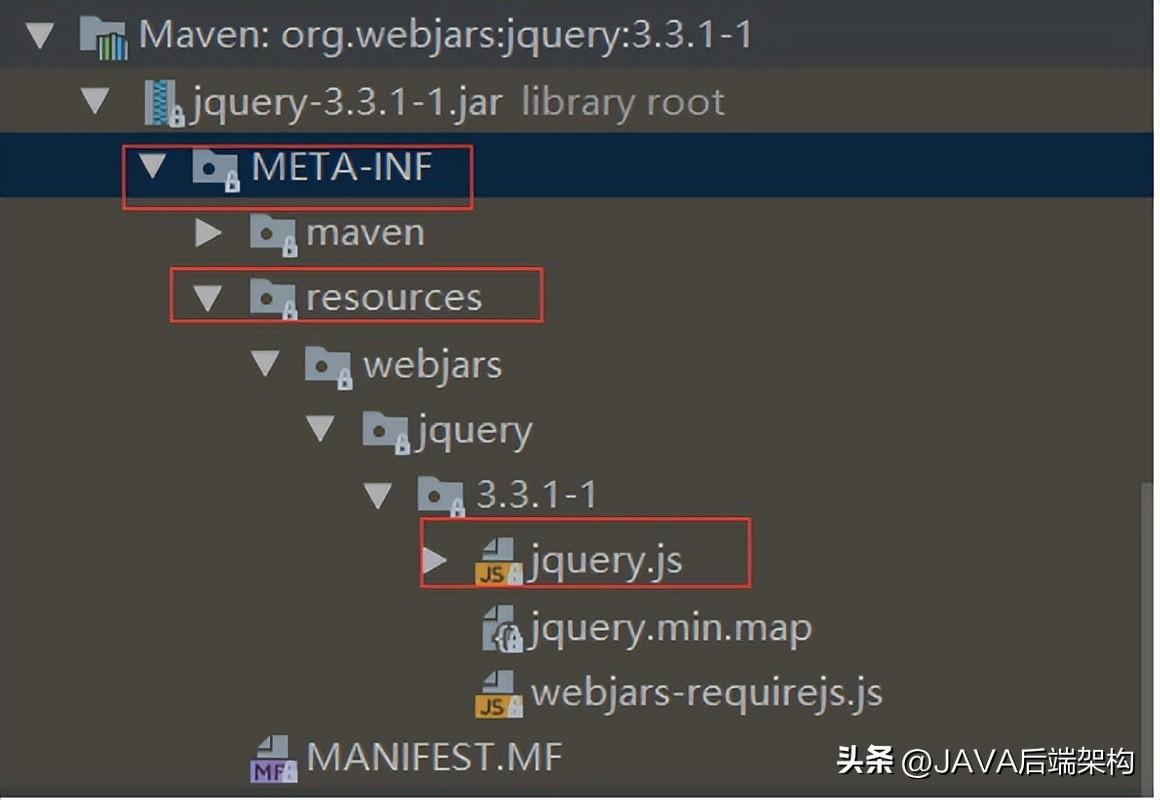
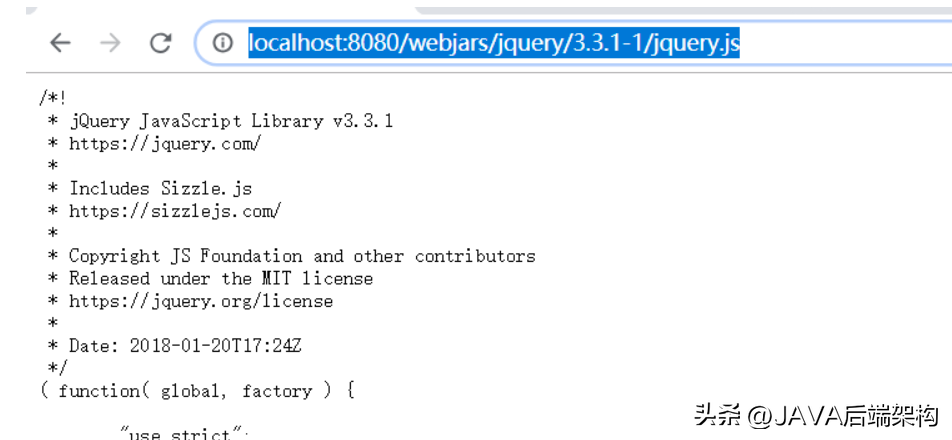
如果顺利的话,此时访问
http://localhost:8080/webjars/jquery/3.3.1-1/jquery.js可以得到文件,结果如下:
2.2 自己的静态文件
另外当访问当前项目的任何资源,都去(静态资源的文件夹)找映射,资源文件夹是一个数组,包括:
"classpath:/META-INF/resources/", "classpath:/resources/","classpath:/static/", "classpath:/public/" ,
"/":当前项目的根路径。只要将静态文件放入其中,那么springboot就能找到。
2.3 首页
在访问"/**",会去找静态资源文件夹下的所有index.html页面。
2.4 图标
所有的 **/访问都是静态资源文件下找favicon.ico。
我们将一些静态文件放在static下,并将index.html放入public文件夹下,如图:

访问
http://localhost:8080/index.html ,可得到正确返回

三、模板引擎
模板引擎有很多,如JSP、Velocity、Freemarker、Thymeleaf,springboot推荐的是Thymeleaf,那我们就来简单看看Thymeleaf语法。导入starter:
<dependency> <groupId>org.springframework.boot</groupId> <artifactId>spring-boot-starter-thymeleaf</artifactId></dependency>进入之后可以看到默认版本,我们也可以改成自己需要的版本。
<thymeleaf.version>3.0.9.RELEASE</thymeleaf.version><!-- 布局功能的支持程序 thymeleaf3主程序 layout2以上版本 --><!-- thymeleaf2 layout1--><thymeleaf-layout-dialect.version>2.2.2</thymeleaf-layout-dialect.version>3.1 Thymeleaf使用
通过源码我们知道,只要我们把HTML页面放在classpath:/templates/,thymeleaf就能自动渲染
@ConfigurationProperties(prefix = "spring.thymeleaf")public class ThymeleafProperties {private static final Charset DEFAULT_ENCODING = Charset.forName("UTF-8");private static final MimeType DEFAULT_CONTENT_TYPE = MimeType.valueOf("text/html");public static final String DEFAULT_PREFIX = "classpath:/templates/";public static final String DEFAULT_SUFFIX = ".html";我们可以去官网查看教程,这里只是简单的进行介绍,主要步骤
第一步:导入命名空间,导入之后会有相应提示
<html lang="en" xmlns:th="http://www.thymeleaf.org">第二步:使用语法
<!DOCTYPE html><html lang="en" xmlns:th="http://www.thymeleaf.org"><head> <meta charset="UTF-8"> <title>Title</title></head><body><h1>成功!</h1> <!--th:text 将div里面的文本内容设置为 --><div><th th:text="${hello}"></th>这是显示欢迎信息</div></body></html>更具体的使用方法,可以去查看官网教程,这种如果没有使用到的话不建议花太多时间去学,很多公司都是前后端分离,即使不是前后端分离,也有很多前端框架给我们使用。这些可以再我们使用的时候再去学习,速度也是很快的。
四、SpringMVC自动配置
4.1 自动配置
springboot默认将为我们配置如下一些SpringMvc的必要组件:
- 必要的ViewResolver(视图解析器:根据方法的返回值得到视图对象(View)),如ContentNegotiatingViewResolver和BeanNameViewResolver。
- 将必要的Converter, GenericConverter, Formatter 等bean注册到ioc容器中。
- 添加了一系列的HttpMessageConverters以便支持对web请求和相应的类型转换。
- 自动配置和注册MessageCodesResolver
任何时候,我们对默认提供的组件设定不满意,都可以注册新的同类型的bean定义来替换,web的所有自动场景都在
org.springframework.boot.autoconfigure.web包中,我们可以参照进行配置。
当然完全靠自动配置在实际开发时不够的,我们经常需要自己配置一些东西,比如拦截器,视图映射规则。
4.2 扩展配置
在sprinboot2.0之前 配置类继承WebMvcConfigurerAdapter,但是现在这个方法已经过时,现在可以使用两种方式,继承WebMvcConfigurer接口或者继承
WebMvcConfigurationSupport类,推荐使用的是
WebMvcConfigurationSupport。
@Configurationpublic class WebConfig implements WebMvcConfigurer { @Override public void addViewControllers(ViewControllerRegistry registry) { registry.addViewController("/yuan").setViewName("success"); }}这段代码就实现了自定义的视图映射。上面这种写法使SpringMVC的自动配置和我们的扩展配置都会起作用
我们甚至可以全面接管springmvc,只要在配置类中增加@EnableWebMv注解,这样所有的SpringMVC的自动配置都失效了。当然,一般情况下我们不会这么做。
五、登陆
web系统一般少不了登录页面,我们先设定默认页面为登录页。
registry.addViewController("/").setViewName("login");registry.addViewController("/index.html").setViewName("login");5.1 登录方法
具体登录html的代码就不贴了,可以下载源码查看,新建controller
@Controllerpublic class LoginController { @PostMapping(value = "/user/login") public String login(@RequestParam("username") String username, @RequestParam("password") String password, Map<String,Object> map, HttpSession httpSession){ if(!StringUtils.isEmpty(username)&& "123456".equals(password)){ //设置session httpSession.setAttribute("loginUser",username); //重定向到主页 return "redirect:/main.html"; }else { map.put("msg","用户名密码错误"); return "login"; } }}5.2 登录拦截器
登录操作完成之后,为了对每个页面进行登录验证,我们还需要设置登录拦截器。先创建登录拦截器
@Componentpublic class LoginHandlerInterceptor implements HandlerInterceptor { public boolean preHandle(HttpServletRequest request, HttpServletResponse response, Object handler) throws Exception { Object user = request.getSession().getAttribute("loginUser"); if(user == null){ //未登陆,返回登陆页面 request.setAttribute("msg","没有权限请先登陆"); request.getRequestDispatcher("/index.html").forward(request,response); return false; }else{ //已登陆,放行请求 return true; } }}然后再加入配置
@Configurationpublic class WebConfig implements WebMvcConfigurer { @Autowired private LoginHandlerInterceptor loginHandlerInterceptor; public void addInterceptors(InterceptorRegistry registry) { registry.addInterceptor(loginHandlerInterceptor).addPathPatterns("/**") .excludePathPatterns("/index.html","/","/user/login"); } }这样在访问其他页面时都会进行登录拦截操作
六、错误处理机制
在进行开发时,错误处理是非常重要的,不管是直接显示给用户,或者返回给前端,都需要尽量友好和清晰。
6.1 默认的错误处理机制
springboot有自身的默认错误处理机制,分为两种
第一种:浏览器,浏览器会返回一个默认的错误页面,如:

第二种:客户端,客户端默认返回的是一个响应一个json数据
如果我们用postman访问,则返回:

6.2 定制错误响应
定制错误响应也分为两种,一种是定制错误页面,第二种是定制错误json数据。
6.2.1 定制错误页面
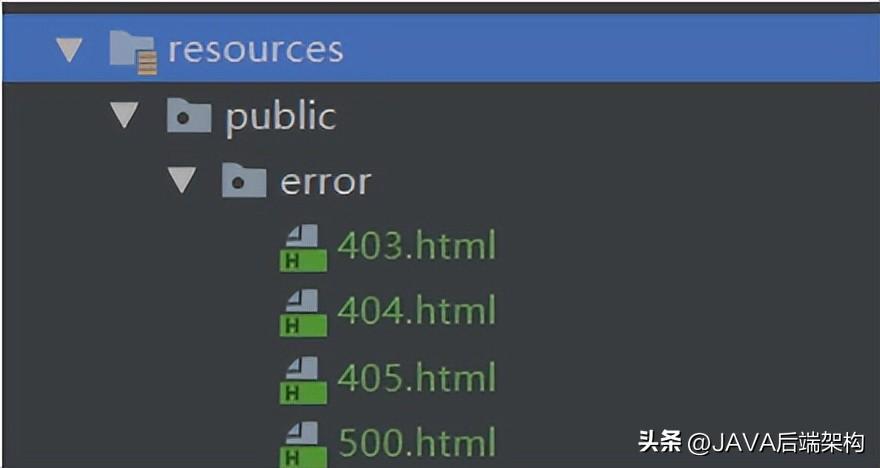
如果我们想要展示更加详细的信息,就将页面放在模板引擎文件夹下,路径名为 error/状态码,【将错误页面命名为错误状态码.html 放在模板引擎文件夹里面的 error文件夹下】,发生此状态码的错误就会来到 对应的页面。在这个页面我们可以获取到一些错误信息,如:
- timestamp:时间戳
- status:状态码
- error:错误提示
- exception:异常对象
- message:异常消息
- errors:JSR303数据校验的错误都在这里
我们可以根据这些错误信息来展示错误,一般不需要这么做,抛出的错误不应该让用户去分析,我们只需要返回静态页面即可,返回错误静态页面是做法也是一样的,只是我们不用将文件放在模板引擎文件夹下。
6.2.2 定制错误的json数据
在实际的开发中我们会对我们的错误码进行规范处理,根据错误会返回相应的错误码,所以我们会自己进行json数据包装处理。
@ControllerAdvicepublic class GlobalDefaultExceptionHandler { @ExceptionHandler(value = RequestException.class) public String requestExceptionHandler(RequestException e,HttpServletRequest request){ Map<String,Object> map = new HashMap<>(); //传入我们自己的错误状态码 4xx 5xx,否则就不会进入定制错误页面的解析流程 request.setAttribute("javax.servlet.error.status_code",500); map.put("code","user.notexist"); map.put("message",e.getMessage()); //转发到/error return "forward:/error"; }}七、配置嵌入式Servlet容器
springboot默认使用Tomcat作为嵌入式的Servlet容器,我们既可以修改Tomcat的一些属性配置,也可以使用其他的Servlet容器,我们这篇就来学习嵌入式Servlet容器的配置。
7.1 、定制和修改Servlet容器的相关配置
servlet的配置类为ServerProperties,进入代码可以看到server能够配置的属性,我们可以对此进行修改。
@ConfigurationProperties(prefix = "server", ignoreUnknownFields = true)public class ServerProperties {我们既可以修改通用的Servlet容器设置,如:
server: port: 8089也可以修改某一种容器的配置,如:
server: tomcat: uri-encoding: utf-87.2 、注册Servlet三大组件【Servlet、Filter、Listener】
注册三大组件用以下方式:
Servlet:ServletRegistrationBean
创建一个MyServlet类:
public class MyServlet extends HttpServlet { @Override public void doGet(HttpServletRequest req, HttpServletResponse resp) throws ServletException, IOException { doPost(req,resp); } @Override public void doPost(HttpServletRequest req, HttpServletResponse resp) throws ServletException, IOException { resp.getWriter().write("hello MyServlet"); }}注入容器:
@Beanpublic ServletRegistrationBean myServlet(){ ServletRegistrationBean registrationBean = new ServletRegistrationBean(new MyServlet(),"/myServlet"); return registrationBean;}Filter:FilterRegistrationBean
创建MyFilter:
public class MyFilter implements Filter { @Override public void init(FilterConfig filterConfig) throws ServletException { } @Override public void doFilter(ServletRequest servletRequest, ServletResponse servletResponse, FilterChain filterChain) throws IOException, ServletException { System.out.println("My filter process"); filterChain.doFilter(servletRequest,servletResponse); } @Override public void destroy() { }}注入容器:
@Beanpublic FilterRegistrationBean myFilter(){ FilterRegistrationBean registrationBean = new FilterRegistrationBean(); registrationBean.setFilter(new MyFilter()); registrationBean.setUrlPatterns(Arrays.asList("/hello","/myServlet")); return registrationBean;}Listener:ServletListenerRegistrationBean
创建MyListener:
public class MyListener implements ServletContextListener { @Override public void contextInitialized(ServletContextEvent sce) { System.out.println("contextInitialized ...web启动"); } @Override public void contextDestroyed(ServletContextEvent sce) { System.out.println("contextDestroyed ...web销毁"); }}注入容器
@Beanpublic ServletListenerRegistrationBean myListener(){ ServletListenerRegistrationBean<MyListener> registrationBean = new ServletListenerRegistrationBean<>(new MyListener()); return registrationBean;}7.3、替换为其他嵌入式Servlet容器
springboot默认为tomcat容器,要替换其他容器就必须修改pom依赖
Jetty:
<!-- 引入web模块 --><dependency> <groupId>org.springframework.boot</groupId> <artifactId>spring-boot-starter-web</artifactId> <exclusions> <exclusion> <artifactId>spring-boot-starter-tomcat</artifactId> <groupId>org.springframework.boot</groupId> </exclusion> </exclusions></dependency><!--引入其他的Servlet容器--><dependency> <artifactId>spring-boot-starter-jetty</artifactId> <groupId>org.springframework.boot</groupId></dependency>Undertow:
<!-- 引入web模块 --><dependency> <groupId>org.springframework.boot</groupId> <artifactId>spring-boot-starter-web</artifactId> <exclusions> <exclusion> <artifactId>spring-boot-starter-tomcat</artifactId> <groupId>org.springframework.boot</groupId> </exclusion> </exclusions></dependency><!--引入其他的Servlet容器--><dependency> <artifactId>spring-boot-starter-undertow</artifactId> <groupId>org.springframework.boot</groupId></dependency>以上是我们在web开发需要先掌握的一些基本技术,有了这些基本知识之后,我们就可以进行CRUD开发,当然在实际的开发中,不管是登录拦截还是错误处理都比这个要复杂,我们以后再详讲。
为帮助开发者们提升面试技能、有机会入职BATJ等大厂公司,特别制作了这个专辑——这一次整体放出。
大致内容包括了: Java 集合、JVM、多线程、并发编程、设计模式、Spring全家桶、Java、MyBatis、ZooKeeper、Dubbo、Elasticsearch、Memcached、MongoDB、Redis、MySQL、RabbitMQ、Kafka、Linux、Netty、Tomcat等大厂面试题等、等技术栈!
欢迎大家关注头条【JAVA后端架构】,回复【666】,获取以上最新Java后端架构VIP学习资料以及视频学习教程,然后一起学习,一文在手,面试我有。
每一个专栏都是大家非常关心,和非常有价值的话题,如果我的文章对你有所帮助,还请帮忙点赞、好评、转发一下,你的支持会激励我输出更高质量的文章,非常感谢!

 鲁公网安备37020202000738号