C++设计模式深度解析:常见类型及实现方法
发表时间: 2020-11-30 16:53
作用:保证一个类只有一个实例,并提供一个访问它的全局访问点,使得系统中只有唯一的一个对象实例。
应用:常用于管理资源,如日志、线程池
实现要点:
在类中,要构造一个实例,就必须调用类的构造函数,并且为了保证全局只有一个实例,
需防止在外部调用类的构造函数而构造实例,需要将构造函数的访问权限标记为private,
同时阻止拷贝创建对象时赋值时拷贝对象,因此也将它们声明并权限标记为private;
另外,需要提供一个全局访问点,就需要在类中定义一个static函数,返回在类内部唯一构造的实例。
class Singleton{public:static Singleton& getInstance(){static Singleton instance;return instance;}void printTest(){cout<<"do something"<<endl;}private:Singleton(){}//防止外部调用构造创建对象Singleton(Singleton const &singleton);//阻止拷贝创建对象Singleton& operator=(Singleton const &singleton);//阻止赋值对象};int main(){Singleton &a=Singleton::getInstance();a.printTest();return 0;}首先,构造函数声明成private的目的是只允许内部调用,getInstance()中的静态局部变量创建时调用,但不允许外部调用构造创建第二个实例;
然后,拷贝构造和拷贝赋值符是声明成了private而不给出定义,其目的是阻止拷贝,如果企图通过拷贝构造来创建第二个实例,编译器会报错。
阻止拷贝的另一种写法是声明后接一个"=delete",也能起到相同的作用(C++11)。
工厂模式包括三种:简单工厂模式、工厂方法模式、抽象工厂模式。
工厂模式的主要作用是封装对象的创建,分离对象的创建和操作过程,用于批量管理对象的创建过程,便于程序的维护和扩展。
(1)简单工厂模式
简单工厂是工厂模式最简单的一种实现,对于不同产品的创建定义一个工厂类,将产品的类型作为参数传入到工厂的创建函数,根据类型分支选择不同的产品构造函数。
//简单工厂模式typedef enum ProductTypeTag{TypeA,TypeB,TypeC}PRODUCTTYPE;class Product//产品抽象基类{public:virtual void Show() = 0;};class ProductA : public Product{public:void Show(){cout<<"I'm ProductA"<<endl;}};class ProductB : public Product{public:void Show(){cout<<"I'm ProductB"<<endl;}};class ProductC : public Product{public:void Show(){cout<<"I'm ProductC"<<endl;}};class Factory//工厂类{public:Product* CreateProduct(PRODUCTTYPE type){switch (type){case TypeA:return new ProductA();case TypeB:return new ProductB();case TypeC:return new ProductC();default:return NULL;}}};int main(){Factory productCreator;Product *productA=productCreator.CreateProduct(TypeA);Product *productB=productCreator.CreateProduct(TypeB);Product *productC=productCreator.CreateProduct(TypeC);productA->Show();productB->Show();productC->Show();if(productA){delete productA;productA=NULL;}if(productB){delete productB;productB=NULL;}if(productC){delete productC;productC=NULL;}return 0;}需要C/C++ Linux服务器架构师学习资料后台私信“资料”(资料包括C/C++,Linux,golang技术,Nginx,ZeroMQ,MySQL,Redis,fastdfs,MongoDB,ZK,流媒体,CDN,P2P,K8S,Docker,TCP/IP,协程,DPDK,ffmpeg等),免费分享

(2)工厂方法模式
其实这才是正宗的工厂模式,简单工厂模式只是一个简单的对创建过程封装。工厂方法模式在简单工厂模式的基础上增加对工厂的基类抽象,不同的产品创建采用不同的工厂创建(从工厂的抽象基类派生),这样创建不同的产品过程就由不同的工厂分工解决:FactoryA专心负责生产ProductA,FactoryB专心负责生产ProductB,FactoryA和FactoryB之间没有关系;如果到了后期,如果需要生产ProductC时,我们则可以创建一个FactoryC工厂类,该类专心负责生产ProductC类产品。
该模式相对于简单工厂模式的优势在于:便于后期产品种类的扩展。
//工厂方法模式typedef enum ProductTypeTag{TypeA,TypeB,TypeC}PRODUCTTYPE;class Product//产品抽象基类{public:virtual void Show() = 0;};class ProductA : public Product{public:void Show(){cout<<"I'm ProductA"<<endl;}};class ProductB : public Product{public:void Show(){cout<<"I'm ProductB"<<endl;}};class Factory//工厂类{public:virtual Product *createProduct()=0;};class FactoryA:public Factory{public:Product *createProduct(){return new ProductA();}};class FactoryB:public Factory{public:Product *createProduct(){return new ProductB();}};class FactoryC:public Factory{public:Product *createProduct(){return new ProductC();}};int main(){Factory *factoryA=new FactoryA();Product *productA = factoryA->createProduct();productA->Show();Factory *factoryB=new FactoryB();Product *productB = factoryB->createProduct();productB->Show();if (factoryA){delete factoryA;factoryA = NULL;}if (factoryB){delete factoryB;factoryB = NULL;}if (productA){delete productA;productA = NULL;}if (productB){delete productB;productB = NULL;}return 0;}(3)抽象工厂模式
抽象工厂模式对工厂方法模式进行了更加一般化的描述。工厂方法模式适用于产品种类结构单一的场合,为一类产品提供创建的接口;而抽象工厂方法适用于产品种类结构多的场合,就是当具有多个抽象产品类型时,抽象工厂便可以派上用场。
抽象工厂模式更适合实际情况,受生产线所限,让低端工厂生产不同种类的低端产品,高端工厂生产不同种类的高端产品。
//抽象工厂模式class ProductA{public:virtual void Show() = 0;};class ProductA1 : public ProductA//A类低端产品{public:void Show(){cout<<"I'm ProductA1"<<endl;}};class ProductA2 : public ProductA//A类高端产品{public:void Show(){cout<<"I'm ProductA2"<<endl;}};class ProductB{public:virtual void Show() = 0;};class ProductB1 : public ProductB//B类低端产品{public:void Show(){cout<<"I'm ProductB1"<<endl;}};class ProductB2 : public ProductB//B类高端产品{public:void Show(){cout<<"I'm ProductB2"<<endl;}};class Factory{public:virtual ProductA *CreateProductA() = 0;virtual ProductB *CreateProductB() = 0;};class Factory1 : public Factory//1号工厂用于生产低端产品{public:ProductA *CreateProductA(){return new ProductA1();}ProductB *CreateProductB(){return new ProductB1();}};class Factory2 : public Factory//2号工厂用于生产高端产品{ProductA *CreateProductA(){return new ProductA2();}ProductB *CreateProductB(){return new ProductB2();}};int main(){Factory *factory1 = new Factory1();ProductA *productA1 = factory1->CreateProductA();ProductB *productB1 = factory1->CreateProductB();productA1->Show();productB1->Show();Factory *factory2 = new Factory2();ProductA *productA2 = factory2->CreateProductA();ProductB *productB2 = factory2->CreateProductB();productA2->Show();productB2->Show();if (factory1){delete factory1;factory1 = NULL;}if (productA1){delete productA1;productA1= NULL;}if (productB1){delete productB1;productB1 = NULL;}if (factory2){delete factory2;factory2 = NULL;}if (productA2){delete productA2;productA2 = NULL;}if (productB2){delete productB2;productB2 = NULL;}}策略模式也是一种非常常用的设计模式,而且也不复杂。下面我们就来看看这种模式。
定义:策略模式定义了一系列的算法,并将每一个算法封装起来,而且使它们还可以相互替换。策略模式让算法独立于使用它的客户而独立变化。
角色:
抽象策略角色(Strategy): 抽象策略类。
具体策略角色(ConcreteStrategy):封装了继续相关的算法和行为。
环境角色(Context):持有一个策略类的引用,最终给客户端调用。
UML图:

事例: (该事例改编自一道网络设计模式面试题)
如现在你是一个设计师,你正在设计一种空调。但是你们的空调要支持3种模式。冷风模式(ColdWind), 热风模式(WramWind),无风模式(NoWind)。
当选择ColdWind模式,将输送冷风;当选择WarmWind模式,将输送热风;在选择NoWind模式时,空调什么都不做。你将考虑如何为空调设计应用程序?如果将来空调需要增加支持新的模式呢?
这道面试题,其实可以用各种模式实现,然而在这里我理解策略模式比较合适。我们将冷风模式,和热风模式以及无风模式可以理解为各种不同的算法。显然策略模式非常符合。
这里ColdWind, WramWind, NoWind 其实就是ConcreteStrategy。 IWnd 是抽象策略类。 所以我们开始这么封装我们策略类
#include <iostream>using namespace std;#define free_ptr(p) \ if(p) delete p; p = NULL; class IWind{public: virtual ~IWind(){}; virtual void blowWind() = 0;}; class ColdWind : public IWind{public: void blowWind(){ cout<<"Blowing cold wind!"<<endl; };}; class WarmWind : public IWind{public: void blowWind(){ cout<<"Blowing warm wind!"<<endl; }}; class NoWind : public IWind{public: void blowWind(){ cout<<"No Wind!"<<endl; }};然后我们实现一个windmode 的类,作为 wind 系列的环境类:
class WindMode{public: WindMode(IWind* wind): m_wind(wind){}; ~WindMode(){free_ptr(m_wind);} void blowWind(){ m_wind->blowWind(); };private: IWind* m_wind;};最后客户端代码:
int main(int argc, char* argv[]){ WindMode* warmWind = new WindMode(new WarmWind()); WindMode* coldWind = new WindMode(new ColdWind()); WindMode* noWind = new WindMode(new NoWind()); warmWind->BlowWind(); coldWind->BlowWind(); noWind->BlowWind(); free_ptr(warmWind); free_ptr(coldWind); free_ptr(noWind); system("pause"); return 0;}(这个实例网上也有人用命令模式实现。命令模式请看我后面的博客。把冷风,热风,无风作为一种命令。当然这是另外一种思路,也未尝不可。但是我觉得如果采用命令模式。类的个数会相应增加(增加系列的命令类),造成额外的开销。当添加一个新模式的时候,你需要添加的类过多。或多或少不是那么明智。所以我个人认为在这里策略模式更好一些。)
总的说来策略模式:
优点:
1、 使用策略模式可以避免使用多重条件转移语句。多重转移语句不易维护。
2、 策略模式让你可以动态的改变对象的行为,动态修改策略
缺点:
1、客户端必须知道所有的策略类,并自行决定使用哪一个策略类。
2、类过多---策略模式造成很多的策略类,每个具体策略类都会产生一个新类。(这点可以通过享元模式来克服类过多)
命令模式将“请求”封装成对象,以便使用不同的请求、队列或者日志来参数化其他对象。命令模式也支持可撤销的操作。
命令对象将动作和接受者包进对象中,这个对象只暴露一个execute()方法。
当需要将发出请求的对象和执行请求的对象解耦的时候,使用命令模式。
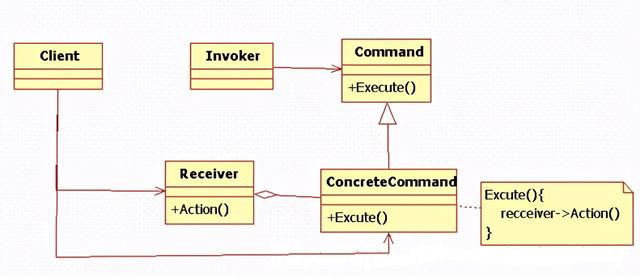
遥控器上有一个插槽,可以放上不同的装置,然后用按钮控制。我们这里放置电灯,并有开和关按钮。可以命令模式实现。

其中,RemoteControl为遥控器,LightOnCommand为开灯请求对象,LightOffCommand为关灯请求对象,他们继承自基类Command,这样设计可以使插槽在以后防止其他的装置。
#include <iostream> using namespace std; //电灯类class Light{public: void on() { cout << "Light on !" << endl; } void off() { cout << "Light off !" << endl; }};//命令类class Command{public: virtual void execute(){}};//具体命令类class LigthOnCommand : public Command{public: LigthOnCommand(Light* lig):light(lig){} //execute方法 void execute() { light->on(); }private: Light* light;}; class LigthOffCommand : public Command{public: LigthOffCommand(Light* lig):light(lig){} void execute() { light->off(); }private: Light* light;}; //遥控器类class RemoteControl{public: void setCommand(Command* command) { slot = command; } void buttonOn() { slot->execute(); }private: Command* slot;};//客户代码int main(){ RemoteControl lightOnControl; RemoteControl lightOffControl; Command* onCommand = new LigthOnCommand(new Light()); Command* offCommand = new LigthOffCommand(new Light()); lightOnControl.setCommand(onCommand); lightOffControl.setCommand(offCommand); lightOnControl.buttonOn(); lightOffControl.buttonOn(); return 0;}执行结果:
Lighton !
Lightoff !
请按任意键继续. .
声明:本站内容部分源于网络转载,出于传递更多信息之目的,并不意味着赞同其观点或证实其描述。文章内容仅供参考,请咨询相关专业人士。
如果无意之中侵犯了您的版权,或有意见、反馈或投诉等情况, 请联系本站,[qq:]
Copyright ©2024 编程密语 All rights reserved 版权所有 鲁ICP备09004228号-12
 鲁公网安备37020202000738号