Vue.js在企业中的必备第三方插件推荐
发表时间: 2020-04-24 06:40
用于开发调试Vue.js的一个必备插件。可以在Chrome中的扩展程序中直接安装,也可以本地文件的方式安装。

当路由切换事会在浏览器的顶部出现一个蓝色进度条用于表示路由切换的进度,并在又上角有个蓝色loading的动画。
一般情况下切换到目标路由时,在目标路由中的生命周期中可能会做一些处理(如请求接口等),这些操作会有一定的耗时,所以使用进度条来表示路由切换的进度。
CSDN在切换路由时就有这种效果。只不过CSDN的进度条是红色的,右上角没有loading。
GitHub: https://github.com/rstacruz/nprogress
1. 安装
cnpm install --save nprogress2. 在main.js中导入
import NProgress from 'nprogress'import 'nprogress/nprogress.css'// 配置NProgress选项// NProgress.configure({ })// 在路由页面跳转使用router.beforeEach((to, from, next) => { // 开始进度条 NProgress.start() // 继续路由 next()})router.afterEach(transition => { // 结束进度条 NProgress.done()})3. HelloWorld.vue
<template> <div> <router-link to="/foo">Go to Foo</router-link> </div></template>Foo.vue
<template> <div> Foo Vue </div></template>
在vue中集成echarts可以通过两种方式集成:
官方示例:
https://echarts.baidu.com/examples/
1 安装echarts依赖
cnpm install echarts -SHelloWorld.vue
<template> <div ref="chartOne" :style="{width: '300px', height: '300px'}"></div></template><script>// 引入Echarts主模块let echarts = require('echarts/lib/echarts')// 引入柱状图require('echarts/lib/chart/bar')// 引入圆饼图require('echarts/lib/chart/pie')// 引入所需组件require('echarts/lib/component/tooltip')require('echarts/lib/component/legend')export default { name: 'Foo', // 创建图表一 methods: { createChartOne () { let chartOne = echarts.init(this.$refs.chartOne) chartOne.setOption({ title: { text: '在Vue中使用echarts' }, tooltip: {}, xAxis: { data: ['iOS', 'Vue', 'Java', 'GO'] }, yAxis: {}, series: [{ name: '热度', type: 'bar', data: [5, 6, 9, 6] }] }) } }, mounted () { this.createChartOne() }}</script>
插件地址:
https://github.com/hilongjw/vue-lazyload
demo:http://hilongjw.github.io/vue-lazyload/
2.1 安装 和 使用插件
cnpm install vue-lazyload --savesrc/main.js 导入import并使用use插件
import VueLazyload from 'vue-lazyload' Vue.use(VueLazyload)// 也可以配置一些选项, 建议使用这种配置方式,配置一些参数Vue.use(VueLazyload, { preLoad: 1.3, error: 'dist/error.png', loading: 'dist/loading.gif', attempt: 1})2.2 需要懒加载的图片绑定 v-bind:src 修改为 v-lazy
<template> <div> <!-- <img v-bind:src="img"> --> <img v-lazy="img"> </div></template><script>export default { name: 'HelloWorld', data () { return { img: 'https://avatar.csdn.net/0/F/7/3_vbirdbest.jpg' } }}</script>
1. 安装组件 file-saver、xlsx、xlsx-style、script-loader
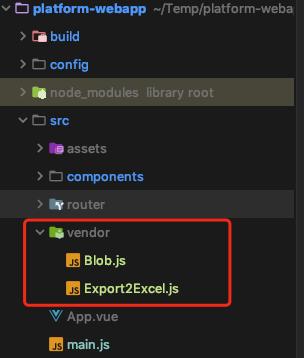
cnpm install -S file-saver xlsx xlsx-stylecnpm install -D script-loader2. 在src下创建vendor文件夹,并创建Blob.js和Export2Excel.js两个文件
Blob.js 文件地址:
https://github.com/eligrey/Blob.js
Export2Excel.js 文件内容请从这里获取
https://blog.csdn.net/vbirdbest/article/details/86527886
3. 在webpack.base.conf.js中配置别名
在alias中增加vendor别名
resolve: { extensions: ['.js', '.vue', '.json'], alias: { 'vue$': 'vue/dist/vue.esm.js', 'vendor': path.resolve(__dirname, '../src/vendor'), '@': resolve('src'), }},
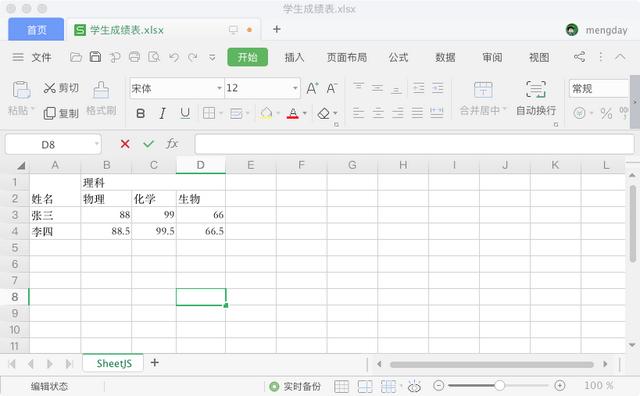
4. 在组件中使用
<template> <div> <el-table :data="tableData" :header-cell-style="{'text-align':'center'}" border> <el-table-column prop="name" label="姓名"> </el-table-column> <el-table-column label="理科"> <el-table-column prop="physics" label="物理"/> <el-table-column prop="chemistry" label="化学"/> <el-table-column prop="biology" label="生物"/> </el-table-column> </el-table> <button @click="handleDownload">导出</button> </div></template><script>export default { name: 'ExcelExportExample', data () { return { tableData: [ { name: '张三', physics: 88, chemistry: 99, biology: 66 }, { name: '李四', physics: 88.5, chemistry: 99.5, biology: 66.5 } ] } }, methods: { handleDownload () { import('@/vendor/Export2Excel').then(excel => { const list = this.tableData const props = ['name', 'physics', 'chemistry', 'biology'] let multiHeader = [['姓名', '理科', '', '']] let header = ['', '物理', '化学', '生物'] // s表示start,指定开始的行r和列c // e表示end,指定结束的行r和列c let merges = [ // 理科合并单元格 { s: {c: 1, r: 0}, e: {c: 3, r: 0} }, // 姓名 { s: {c: 0, r: 0}, e: {c: 0, r: 1} } ] const data = list.map(v => props.map(j => v[j])) excel.export_json_to_excel({ multiHeader: multiHeader, merges: merges, header: header, data: data, filename: '学生成绩表', autoWidth: true, bookType: 'xlsx' }) }) } }}</script>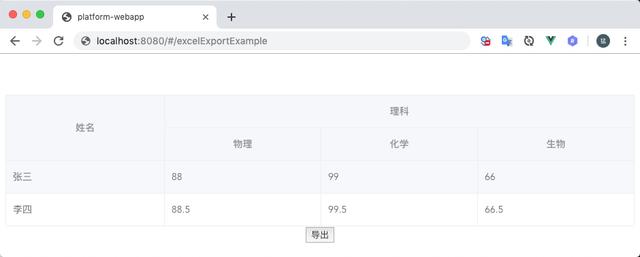
注意:
导入只需要安装xlsx插件
npm install xlsx --saveExcelImportExample.vue<template> <div> <input type="file" @change="importFile(this)" id="imFile" style="display: none" accept="application/vnd.openxmlformats-officedocument.spreadsheetml.sheet, application/vnd.ms-excel"/> <el-button @click="uploadFile()">导入</el-button> <div>{{excelData}}</div> </div></template><script>// 引入xlsxvar XLSX = require('xlsx')export default { name: 'ExcelImportExample', data () { return { imFile: '', excelData: [] } }, mounted () { this.imFile = document.getElementById('imFile') }, methods: { uploadFile: function () { // 点击导入按钮 this.imFile.click() }, importFile: function () { // 导入excel let obj = this.imFile if (!obj.files) { return } var f = obj.files[0] var reader = new FileReader() let $t = this reader.onload = function (e) { var data = e.target.result if ($t.rABS) { $t.wb = XLSX.read(btoa(this.fixdata(data)), { // 手动转化 type: 'base64' }) } else { $t.wb = XLSX.read(data, { type: 'binary' }) } let json = XLSX.utils.sheet_to_json($t.wb.Sheets[$t.wb.SheetNames[0]]) console.log(typeof json) $t.dealFile($t.analyzeData(json)) // analyzeData: 解析导入数据 } if (this.rABS) { reader.readAsArrayBuffer(f) } else { reader.readAsBinaryString(f) } }, analyzeData: function (data) { // 此处可以解析导入数据 return data }, dealFile: function (data) { // 处理导入的数据 console.log(data) this.imFile.value = '' if (data.length <= 0) { console.log('数据错误') } else { this.excelData = data } }, // 文件流转BinaryString fixdata: function (data) { var o = '' var l = 0 var w = 10240 for (; l < data.byteLength / w; ++l) { o += String.fromCharCode.apply(null, new Uint8Array(data.slice(l * w, l * w + w))) } o += String.fromCharCode.apply(null, new Uint8Array(data.slice(l * w))) return o } }}</script>

moment.js 日期处理类库。中文网站: http://momentjs.cn/
安装
cnpm install moment --save在使用的组件中导入
<template> <div> {{ new Date() | dateFrm}} </div></template><script>import moment from 'moment'export default { name: 'HelloWorld', filters: { dateFrm: function (value) { return moment(value).format('YYYY-MM-DD HH:mm:ss') } }}</script>
注意:moment.js中的日期格式化与其它语言如(Java)中的格式不太一样。
声明:本站内容部分源于网络转载,出于传递更多信息之目的,并不意味着赞同其观点或证实其描述。文章内容仅供参考,请咨询相关专业人士。
如果无意之中侵犯了您的版权,或有意见、反馈或投诉等情况, 请联系本站,[qq:]
Copyright ©2024 编程密语 All rights reserved 版权所有 鲁ICP备09004228号-12
 鲁公网安备37020202000738号