Java编程:NIO基础操作指南
发表时间: 2022-10-17 13:41
NIO是New I/O的简称,与旧式基于流的I/O相对,从名字上来看,它表示新的一套I/O标准。它是从JDK1.4中被纳入到JDK中的。
与旧式的IO流相比,NIO是基于Block的,它以块为单位来处理数据,最为重要的两个组件是缓冲区Buffer和通道Channel。缓冲区是一块连续的内存块,是NIO读写数据的载体;通道表示缓冲数据的源头和目的地,它用于向缓冲区读取或者写入数据,是访问缓冲区的接口。

Buffer中最重要的3个参数:位置(position)、容量(capacity)、上限(limit)。他们3者的含义如下
位置(position): 表示当前缓冲区的位置,从position位置之后开始读写数据。容量(capacity): 表示缓冲区的最大容量上限(limit): 表示缓冲区的实际上限,它总是小于或等于容量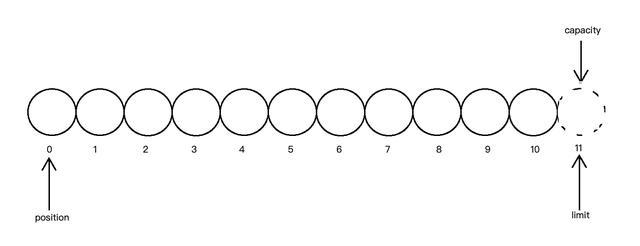
缓冲区的容量(capacity)是不变的,而位置(position)和上限(limit)和以根据实际需要而变化。也就是说,可以通过改变当前位置和上限来操作缓冲区内任意位置的数据。
NIO提供一系列方法来操作Buffer的位置(position)和上限(limit),以及向缓冲区读写数据。
put() //向缓冲区position位置添加数据。并且position往后移动,不能超过limit上限。get() //读取当前position位置的数据。并且position往后移动,不能超过limit上限。flip() //将limit置位为当前position位置,再讲position设置为0rewind() //仅将当前position位置设置为0remaining //获取缓冲区中当前position位置和limit上限之间的元素数(有效的元素数)hasRemaining() //判断当前缓冲区是否存在有效的元素数mark() //在当前position位置打一个标记reset() //将当前position位置恢复到mark标记的位置。duplicate() //复制缓冲区创建缓冲区
//创建一个容量为10的缓冲区ByteBuffer byteBuffer1=ByteBuffer.allocate(10);//创建一个包裹数据的缓冲区ByteBuffer byteBuffer2 = ByteBuffer.wrap("abcde".getBytes());获取/设置缓冲区参数
//创建一个容量为10的缓冲区ByteBuffer byteBuffer=ByteBuffer.allocate(10);System.out.println("位置:"+byteBuffer.position()); //0System.out.println("上限:"+byteBuffer.limit()); //10System.out.println("容量:"+byteBuffer.capacity());//10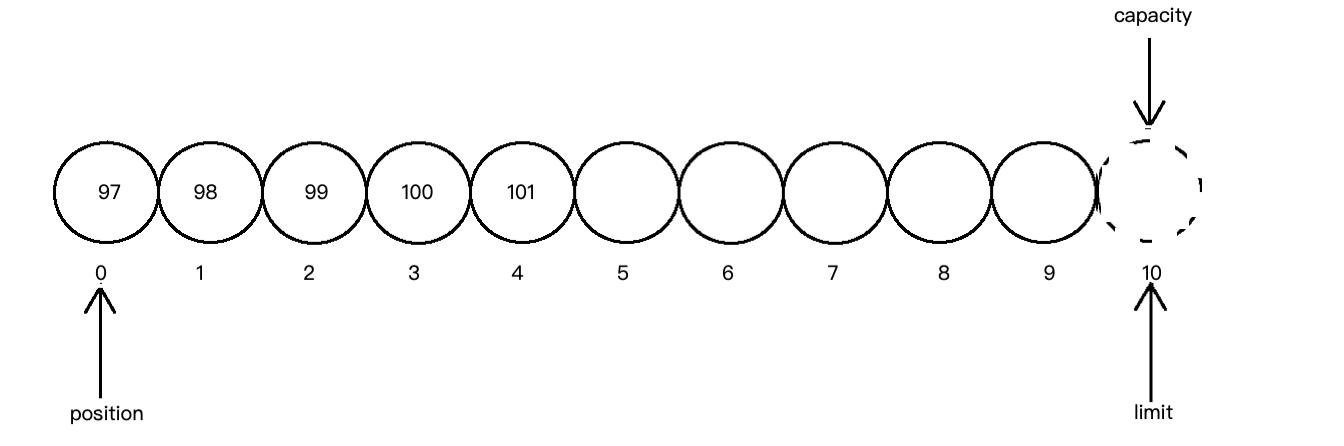
添加数据到缓冲区
//创建一个容量为10的缓冲区ByteBuffer byteBuffer=ByteBuffer.allocate(10);//添加数据到缓冲区byteBuffer.put("abcde".getBytes());System.out.println("position位置:"+byteBuffer.position()); //5System.out.println("limit上限:"+byteBuffer.limit()); //10System.out.println("capacity容量:"+byteBuffer.capacity()); //10
rewind重置缓冲区
rewind函数将position置为0位置,并清除标记。
//创建一个容量为10的缓冲区ByteBuffer byteBuffer=ByteBuffer.allocate(10);//添加数据到缓冲区byteBuffer.put("abcde".getBytes());System.out.println("position位置:"+byteBuffer.position()); //5System.out.println("limit上限:"+byteBuffer.limit()); //10System.out.println("capacity容量:"+byteBuffer.capacity()); //10System.out.println("------------");//重置缓冲区byteBuffer.rewind();System.out.println("position位置:"+byteBuffer.position()); //0System.out.println("limit上限:"+byteBuffer.limit()); //10System.out.println("capacity容量:"+byteBuffer.capacity());//10
flip重置缓冲区
flip函数现将limit设置为position位置,再将position置为0位置,并清除mar标记。
//创建一个容量为10的缓冲区ByteBuffer byteBuffer=ByteBuffer.allocate(10);//添加数据到缓冲区byteBuffer.put("abcde".getBytes());System.out.println("position位置:"+byteBuffer.position()); //5System.out.println("limit上限:"+byteBuffer.limit()); //10System.out.println("capacity容量:"+byteBuffer.capacity()); //10System.out.println("------------");//重置缓冲区byteBuffer.flip();System.out.println("position位置:"+byteBuffer.position()); //0System.out.println("limit上限:"+byteBuffer.limit()); //5System.out.println("capacity容量:"+byteBuffer.capacity());//10
clear清空缓冲区
clear方法也将position置为0,同时将limit置为capacity的大小,并清除mark标记。
//创建一个容量为10的缓冲区ByteBuffer byteBuffer=ByteBuffer.allocate(10);//设置上限为5byteBuffer.limit(5);//添加数据到缓冲区byteBuffer.put("abcde".getBytes());System.out.println("position位置:"+byteBuffer.position()); //5System.out.println("limit上限:"+byteBuffer.limit()); //5System.out.println("capacity容量:"+byteBuffer.capacity()); //10System.out.println("------------");//重置缓冲区byteBuffer.clear();System.out.println("position位置:"+byteBuffer.position()); //0System.out.println("limit上限:"+byteBuffer.limit()); //10System.out.println("capacity容量:"+byteBuffer.capacity());//10
标记和恢复
ByteBuffer buffer = ByteBuffer.allocate(10);//添加数据到缓冲区buffer.put("abcde".getBytes());//打一个标记buffer.mark();System.out.println("标记位置:"+buffer.position()); //5//再添加5个字节数据到缓冲区buffer.put("fijkl".getBytes());System.out.println("当前位置:"+buffer.position()); //10//将position恢复到mark标记位置buffer.reset();System.out.println("恢复标记位置:"+buffer.position());//5FileChannel是用于操作文件的通道,可以用于读取文件、也可以写入文件
//创建读取文件通道FileChannel fisChannel = new FileInputStream("day05/src/a.txt").getChannel();//创建写入文件的通道FileChannel fosChannel = new FileOutputStream("day05/src/b.txt").getChannel();//创建缓冲区ByteBuffer buffer = ByteBuffer.allocate(2);while (fisChannel.read(buffer)!=-1){ System.out.println("position:"+buffer.position()); //0 System.out.println("limit:"+buffer.limit());//2 //重置缓冲区(为输出buffer数据做准备) buffer.flip(); fosChannel.write(buffer); //重置缓冲区(为输入buffer数据做准备) buffer.clear();}//关闭通道fisChannel.close();fosChannel.close();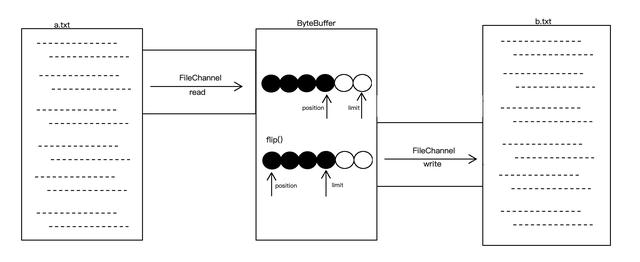
public class Client { public static void main(String[] args) throws IOException { //创建通道 SocketChannel socketChannel = SocketChannel.open(new InetSocketAddress("127.0.0.1", 10000)); //创建缓冲区 ByteBuffer buffer = ByteBuffer.allocate(1024); //读取本地文件数据到缓冲区 FileChannel fisChannel = new FileInputStream("day05/src/a.txt").getChannel(); while (fisChannel.read(buffer)!=-1){ buffer.flip(); //为写入数据做准备 socketChannel.write(buffer); buffer.clear(); //为读取数据做准备 } //关闭本地通道 fisChannel.close(); //socketChannel.shutdownOutput(); //读取服务端回写的数据 buffer.clear(); int len = socketChannel.read(buffer); System.out.println(new String(buffer.array(), 0, len)); //关闭socket通道 socketChannel.close(); }}下面代码使用ServerSocketChannel通道接收文件并保存到服务器
public class Server { public static void main(String[] args) throws IOException { //1.创建ServerSocketChannel通道 ServerSocketChannel serverSocketChannel = ServerSocketChannel.open(); //2.绑定端口号 serverSocketChannel.bind(new InetSocketAddress(10000)); //3.设置非阻塞 serverSocketChannel.configureBlocking(false); System.out.println("服务器已开启"); while (true) { //4.获取客户端通道,如果有客户端连接返回客户端通道,否则返回null SocketChannel socketChannel = serverSocketChannel.accept(); if(socketChannel!=null){ socketChannel.configureBlocking(false); //创建本地通道,用于往文件中写数据 UUID uuid = UUID.randomUUID(); FileChannel fosChannel=new FileOutputStream("day05/src/"+uuid+".txt").getChannel(); ByteBuffer buffer=ByteBuffer.allocate(1024); while (socketChannel.read(buffer)>0){ buffer.flip(); //准备把缓冲区数据输出 fosChannel.write(buffer); buffer.clear();//准备读取数据到缓冲区 } fosChannel.close(); //回写数据到客户端 ByteBuffer resultBuffer=ByteBuffer.wrap("上传文件成功".getBytes()); socketChannel.write(resultBuffer); //关闭客户端通道 socketChannel.close(); } } }}Selector 一般称 为选择器 ,当然你也可以翻译为 多路复用器 。它是Java NIO核心组件中的一个,用于检查一个或多个NIO Channel(通道)的状态是否处于可读、可写。如此可以实现单线程管理多个channels,也就是可以管理多个网络链接。

使用Selector的服务器模板代码
有了模板代码我们在编写程序时,大多数时间都是在模板代码中添加相应的业务代码
ServerSocketChannel ssc = ServerSocketChannel.open();ssc.socket().bind(new InetSocketAddress("localhost", 8080));ssc.configureBlocking(false);Selector selector = Selector.open();ssc.register(selector, SelectionKey.OP_ACCEPT);while(true) { int readyNum = selector.select(); if (readyNum == 0) { continue; } Set<SelectionKey> selectedKeys = selector.selectedKeys(); Iterator<SelectionKey> it = selectedKeys.iterator(); while(it.hasNext()) { SelectionKey key = it.next(); if(key.isAcceptable()) { // 接受连接 } else if (key.isReadable()) { // 通道可读 } else if (key.isWritable()) { // 通道可写 } it.remove(); }}按照上面的模板代码,改写接收文件的服务端。
public class Server { public static void main(String[] args) { try { ServerSocketChannel ssc = ServerSocketChannel.open(); ssc.socket().bind(new InetSocketAddress("localhost", 10000)); ssc.configureBlocking(false); Selector selector = Selector.open(); ssc.register(selector, SelectionKey.OP_ACCEPT); FileChannel fosChannel=null; while (true) { int readyNum = selector.select(); System.out.println(readyNum); if (readyNum == 0) { continue; } Set<SelectionKey> selectedKeys = selector.selectedKeys(); Iterator<SelectionKey> it = selectedKeys.iterator(); while (it.hasNext()) { SelectionKey key = it.next(); SocketChannel socketChannel1=null; SocketChannel socketChannel2=null; if (key.isAcceptable()) { System.out.println("isAcceptable"); // 创建新的连接,并且把连接注册到selector上,而且, // 声明这个channel只对读操作感兴趣。 socketChannel1 = ssc.accept(); socketChannel1.configureBlocking(false); socketChannel1.register(selector, SelectionKey.OP_READ); UUID uuid = UUID.randomUUID(); fosChannel=new FileOutputStream("day05/src/"+uuid+".txt").getChannel(); } else if (key.isReadable()) { System.out.println("isReadable"); // 通道可读 socketChannel2 = (SocketChannel) key.channel(); //创建本地通道,用于往文件中写数据 ByteBuffer readBuff=ByteBuffer.allocate(1024); while (socketChannel2.read(readBuff)>0){ readBuff.flip(); //准备把缓冲区数据输出 fosChannel.write(readBuff); readBuff.clear();//准备读取数据到缓冲区 } fosChannel.close(); key.interestOps(SelectionKey.OP_WRITE); } else if (key.isWritable()) { System.out.println("isWritable"); // 通道可写 ByteBuffer writeBuff=ByteBuffer.allocate(1024); writeBuff.put("上传成功".getBytes()); writeBuff.flip(); SocketChannel socketChannel = (SocketChannel) key.channel(); socketChannel.write(writeBuff); key.interestOps(SelectionKey.OP_READ); } it.remove(); } } } catch (Exception e) { //e.printStackTrace(); } finally { } }}声明:本站内容部分源于网络转载,出于传递更多信息之目的,并不意味着赞同其观点或证实其描述。文章内容仅供参考,请咨询相关专业人士。
如果无意之中侵犯了您的版权,或有意见、反馈或投诉等情况, 请联系本站,[qq:]
Copyright ©2024 编程密语 All rights reserved 版权所有 鲁ICP备09004228号-12
 鲁公网安备37020202000738号